As I write today’s post I am feeling very pleased with the setup as it stands. The aim of this post is to detail the steps required to setup Windows 8 as a VM for Xen 4.3 on Arch Linux, with working GPU on reboot.
To recap quickly my summer project, which I embarked upon some 4 weeks ago, has been all about consolidation and making my ’24/7 server’ at home earn its keep somewhat. What I have now is the following:
Dom0 (Host) – Arch Linux
- Arch Linux with Xen Hypervisor 4.3.0-4 (ATI patched).
- XBMC via the motherboard HDMI out powered by the i5 3470’s HD4000 internal GPU.
- XBMC MySQL database host.
DomU1 – unRAID 5.0
- 23TB of protected storage (JBOD + parity drive) which only spins the drive it’s currently reading from – this is very important for me when I have 12 drives!
- PCI Passthrough of 2x SATA controllers – 1x Supermicro SAS-AOC-SASLP-MV8 (8 ports), 1x motherboard SATA controller (6 ports)
- unRAID Server is a Network Attached Storage server operating system that boots from a USB Flash device and specifically designed for digital media storage.
DomU2 – Ubuntu 13.04
- SABnzbd, Sickbeard, Couchpotato, Subsonic, OwnCloud, Dropbox, Google Drive, Headphones, Plex Media Server, BTSync and Air Video Server.
- This VM automates all the media collection from the Internet and makes sure, via BTSync, that my photo collection is exchanged with a friend for backup purposes.
DomU3 – Windows 8
- My desktop computer.
- My gaming rig.
- VGA passthrough of a Sapphire HD7870 Ghz edition.
- HDMI output from GPU split 2 ways – 1 to Lounge TV, 1 to desktop monitor upstairs via 30m Cat6 HDMI extenders.
- USB passthrough connected to wireless Xbox 360 controller for Lounge gaming.
- 30m USB over Cat5e extenders for keyboard and mouse to a powered USB hub upstairs on my desk.
DomU4 – Dev Machine (OS changes frequently)
- Web development etc.
- App development etc.
How to setup Windows 8 with VGA passthrough (to survive a reboot of VM)
Setting up Windows as a VM on Xen is a piece of cake really. VGA passthrough with my ATI card was just as easy as passing through a disk controller to unRAID etc. Where I’ve spent the last week going around in circles is regarding host lockups / VM black screens on reboot. I’m pleased to say I’ve fixed this and have included all the necessary info below.
The version of Xen I used is 4.3.0-4 and can be found here (remember to compile it with ATI patch enabled by editing PKGBUILD before running makepkg -s). This package is maintained by Kantras on AUR, make sure to go thank him for it!
Updated 22/12/2013
Here is a freshly compiled, working package of Xen – xen-4.3.1-2-x86_64.pkg.tar.xz Change directory to wherever you like and install the package like this:
wget <copy link to package>
pacman -U <package name>
Install Windows 8
You’ll need a Windows 8 .iso to do this. Here is my xl config file.
kernel = 'hvmloader'
builder = 'hvm'
vcpus = '4'
memory = '8192'
device_model_version="qemu-xen-traditional"
disk = [
        'phy:/dev/vg2/win,hda,w',
        'phy:/dev/vg1/winDATA,hdb,w',
        'file:/data/Windows8Pro.iso,hdc:cdrom,r'
]
name = 'windows'
vif = [ 'mac=00:16:3E:51:20:4C,bridge=xenbr0,model=e1000' ]
on_poweroff = 'destroy'
on_reboot = 'restart'
on_crash = 'restart'
boot = 'dc'
acpi = '1'
apic = '1'
viridian = '1'
xen_platform_pci='1'
sdl = '0'
vnc = '1'
vnclisten = '0.0.0.0'
vncpasswd = ''
stdvga = '0'
usb = '1'
usbdevice = 'tablet'
pci = ['01:00.0','01:00.1','00:1d.0']
It’s worth noting that you’ll have to create an LVM structure for your Windows install, mine is split in two but it’s up to you. If you’re unsure about what to do here I recommend this page on the Arch Wiki.
https://wiki.archlinux.org/index.php/LVM
Furthermore, you probably want to install Windows with no PCI passthrough and do it over VNC.
Post install tasks
Once Windows is installed it’s time to passthrough your USB ports and GPU (video and audio remember, hence the 3x devices on my list). I have done a ton of other posts on PCI passthrough so will not cover that here.
You must make sure that you use traiditional qemu as upstream is broken and it will not currently work! It’s in my config so if you just copied and pasted, you’re good to go!
device_model_version="qemu-xen-traditional"Now boot up Windows using xl create as normal. It’s working right? Right?! Awesome. Well let’s fix reboots now…
Getting rebooting to work
So, rebooting works just fine if you manually eject the card before rebooting the VM but who wants to do that EVERY time?! No-one. So here’s how you automate it.
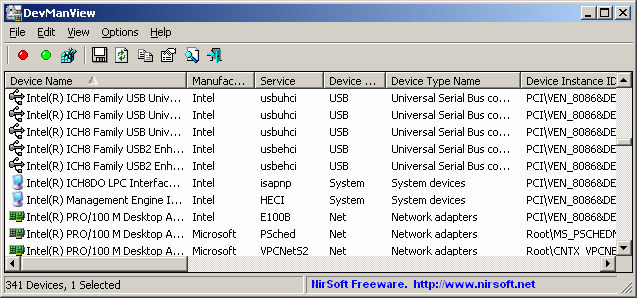
Go to nirsoft and download DevManView.exe (64 bit is required if you’re running 64 bit Windows), also download my reboot scripts below.
http://www.nirsoft.net/utils/device_manager_view.html
Reboot Scripts and Device Instance IDs
Place the DevManView.exe file anywhere you like in your system, I put mine the root of “C:/Program Files”. If you place it anywhere else you should update the paths in the logon.cmd and logoff.cmd appropriately.
You’ll need to use DevManView to grab your Device Instance ID (copy and paste works great when you select the graphics card row) and replace the ID in my scripts. Replace between the speech marks only, leaving the speech marks at either end of the Device ID, which will look something like this:
PCIVEN_1002&DEV_6779&SUBSYS_32001682&REV_003&267a616a&2&28Note: this ID will be different for your system and is case sensitive. Just copy and paste!
If you’d like to test your script is working before rebooting, just double click the logon script. If your display goes black and comes back after a few seconds, it worked. The logon script disables then immediately reenables the card, so it’s a good test.
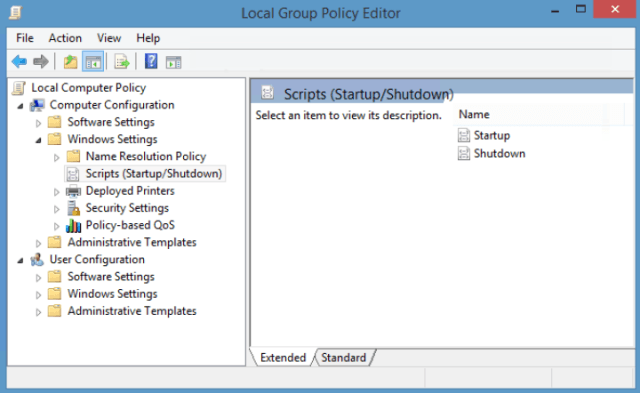
Use gpedit.msc to automate the process at startup and shutdown
Next you need to tell these scripts to run automatically at startup and shutdown using “gpedit.msc“. Add the logon script to startup and logoff to shutdown.
That’s it. Simple, automated and solid.
*** Before doing anything complex like Windows Update it is advised to disable the adapter altogether and perform the maintenance with VNC only. Once updates etc are done, you’re OK again.