
At Linuxserver.io we decided that this may be a good way for us to run test dockers and compile the mediabuild leaving our own personal arrays intact. Especially for creating the mediabuild it means that restarts do not need to happen on the host, which was only possible for me if my wife was not using the array at all (ie watching live tv, listening to music).
Allowing reckless experimentation without putting our personal data at risk or upsetting the wife seems a good idea.
Prequisites
- A free Unraid license key and the associated USB key
- (to run an Unraid VM on Unraid Host you need two license keys)
- A USB Key to create the VM bootable file
- A free USB controller that does not contain your host USB key
- Unassigned Devices plugin installed
STEP 1 – Prepare the VM bootable Virtual Drive
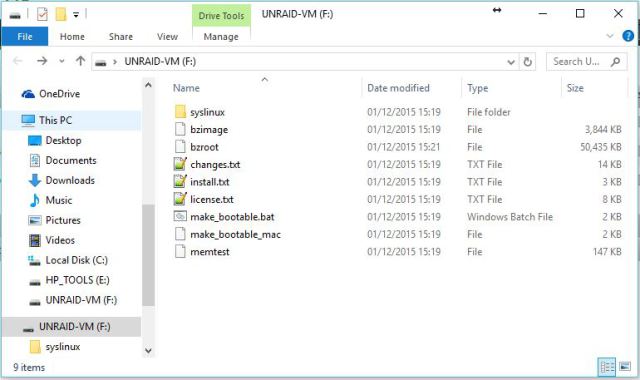
For this you need a bootable USB key with all the Unraid files on it other than /config and it’s contents. This will be where you normally store any files that would normally be saved to your flash disk, like plugin files, docker xmls etc. So bear this in mind when selecting a suitable size.
Insert the USB key into your desktop machine and install Unraid on it the same as you normally would, make this bootable with the script included in the Unraid zip file.
IMPORTANT Delete the config folder and rename the USB key UNRAID-VM
It should look like this…
STEP 2 – Create the Unraid Bootable Virtual Disk
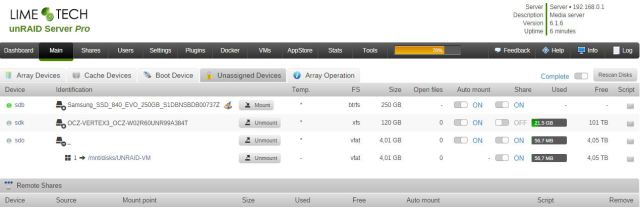
Insert the key into your Unraid server, if you have the Unassigned devices plugin installed then look to see which drive is your UNRAID-VM key.
You can see here mine is sdo…
Open up a telnet/SSH session and run, changing sd? to suit and/path/to/ to wherever you want your Unraid VM drive to reside.
qemu-img convert -O raw /dev/sd? /path/to/unraid-vm.imgSTEP 3 – Find a USB Controller to passthrough to the VM
Whilst it’s possible to passthrough just the USB key, I found that problematic as Unraid got confused with two USB devices both called UNRAID on the machine. So instead, using the guide by archedraft here, I did steps 1-9 to identify my free USB controller to passthrough, mine was…
00:1d.0 USB controller: Intel Corporation 7 Series/C210 Series Chipset Family USB Enhanced Host Controller #1 (rev 04)Now I know that I want to passthrough the USB controller on 00:1d.0 so using the guide from jonp here, I applied the same technique that I already use for my dual-NIC to prevent Unraid from ever “seeing” it.
lspci -nwhich gives me
00:00.0 0600: 8086:0150 (rev 09)
00:01.0 0604: 8086:0151 (rev 09)
00:02.0 0300: 8086:0152 (rev 09)
00:14.0 0c03: 8086:1e31 (rev 04)
00:16.0 0780: 8086:1e3a (rev 04)
00:1a.0 0c03: 8086:1e2d (rev 04)
00:1c.0 0604: 8086:1e10 (rev c4)
00:1c.4 0604: 8086:1e18 (rev c4)
00:1c.5 0604: 8086:1e1a (rev c4)
00:1c.6 0604: 8086:1e1c (rev c4)
00:1c.7 0604: 8086:1e1e (rev c4)
00:1d.0 0c03: 8086:1e26 (rev 04)
00:1f.0 0601: 8086:1e4a (rev 04)
00:1f.2 0106: 8086:1e02 (rev 04)
00:1f.3 0c05: 8086:1e22 (rev 04)
01:00.0 0200: 8086:105e (rev 06)
01:00.1 0200: 8086:105e (rev 06)
02:00.0 0107: 1000:0072 (rev 03)
03:00.0 0480: 544d:6178
04:00.0 0200: 10ec:8168 (rev 06)
05:00.0 0300: 1002:6779
05:00.1 0403: 1002:aa98
06:00.0 0106: 1b21:0612 (rev 01)
now that tells me that the vendor/product id is 8086:1e26 so edit syslinux.cfg with the pci-stub added.
default /syslinux/menu.c32
menu title Lime Technology
prompt 0
timeout 50

label unRAID V6.1.6
    menu default
    kernel /bzimage
    append pci-stub.ids=8086:1e26 initrd=/bzroot

label unRAID V6.1.6 Safe Mode (no plugins)

    kernel /bzimage
    append pci-stub.ids=8086:1e26 initrd=/bzroot
    unraidsafemode

label Memtest86+
    kernel /memtest
And then save this code after editing the bus, slot and function to your setup you’re going to need it in a while…
<hostdev mode='subsystem' type='pci' managed='yes'>
    <driver name='vfio' />
    <source>
        <address domain='0x0000' bus='0x00' slot='0x1d' function='0x0'/>
    </source>
</hostdev>
```

###STEP 4 – Preparing the Unraid Licensed USB

Once you’ve worked out which USB controller your VM key is going to reside on, it’s worthwhile preparing the key a little and ensuring it no longer remains bootable. This key has to be the key to which your Unraid license is attached.

I would recommend making sure this USB is not bootable just to avoid any potential issues with booting from the wrong USB key. I used diskpart on my Windows machine (must be run as an administrator) and ran these commands.

```shell
list disk
select disk ?
clean
create partition primary
select partition 1
active
format fs=fat32 quick label=”UNRAID”
exit
All you need on this USB key is the /config folder and it’s contents and the license key for the USB key in the /config folder.
(As a note, you can actually rename your license .key files and place them on all your USB keys. I have Unraid1.key and Unraid2.key present on both my Unraid USB Sticks)
STEP 5 – Create the VM
This is the easy bit…
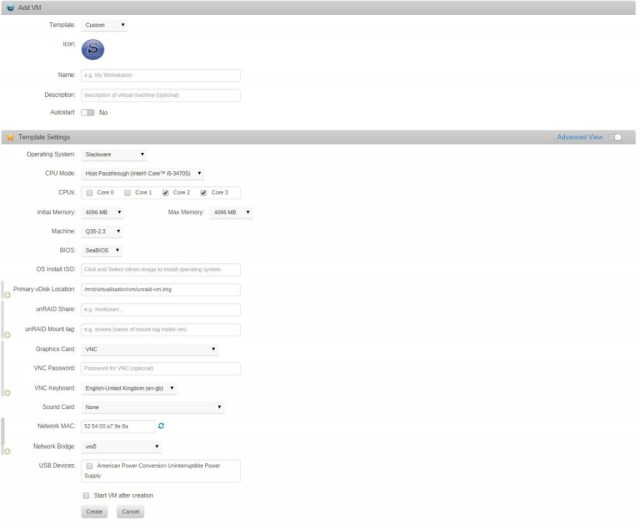
Note my network bridge is called vm0, yours is probably br0, it makes no difference..
But don’t start it yet, first reboot your machine.
ENSURE ALL THE USB STICKS OTHER THAN THE HOST UNRAID STICK ARE REMOVED
Once you’ve rebooted….
STEP 6 – Paste in the USB Bus Code
Edit the XML for the Unraid VM and paste in the code you saved earlier.
<hostdev mode='subsystem' type='pci' managed='yes'>
    <driver name='vfio' />
    <source>
        <address domain='0x0000' bus='0x00' slot='0x1d' function='0x0' />
    </source>
</hostdev>
then put your Unraid license key containing /config in whatever USB slot you’ve chosen to passthrough…
STEP 7 – Start the VM
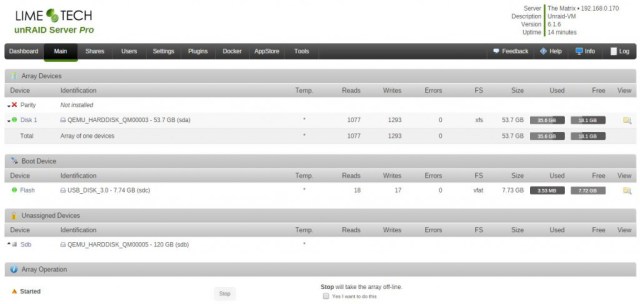
You should find that it boots into a fresh copy of Unraid without any problems…. other than that there are no drives….
APPENDIX 1 – Adding drives to your virtual array
There are two options here, either create a virtual drive or two, or passthrough drives bare metal. As I personally only want to do some testing and compiling on here, I chose to create one virtual drive, allocate it to Disk1 and run without parity. I have created two virtual drives and allocated them to Disk1 and Disk2 but as they were both located on the same physical drive I couldn’t see much sense in that..
I wouldn’t recommend creating an array of virtual disks all located on the same physical drive as that just seems a pointless idea that will increase the load on your physical host drive.
ADDING VIRTUAL DISKS
To create a 10GB virtual drive…
qemu-img create -f raw /path/to/disk1.img 10GThen to add it to the VM select it in the webui like so

Unraid can’t see drives on the virtio bus so back to the XML to do some editing.
Find this bit..
<disk type='file' device='disk'>
    <driver name='qemu' type='raw' cache='writeback'/>
    <source file='/mnt/virtualisation/vm/Unraid VM/disk1.img'/>
    <target dev='hdb' bus='virtio'/>
    <address type='pci' domain='0x0000' bus='0x02' slot='0x05' function='0x0'/>
</disk>
and change it to
<disk type='file' device='disk'>
    <driver name='qemu' type='raw' cache='writeback'/>
    <source file='/mnt/virtualisation/vm/Unraid VM/disk1.img'/>
    <target dev='hdb' bus='virtio'/>
    <address type='pci' domain='0x0000' bus='0x02' slot='0x05' function='0x0'/>
</disk>
Note: Once you’ve made changes via the webui you may need to add in the passthrough code for the USB bus again…
PASSTHROUGH OF BARE METAL DISKS
Navigate to /dev/disk/by-id/ and find the name of the disk you wish to passthrough and use the below as a template, alternatively you can use the Unassigned Devices plugin to identify the disk as shown here…

<disk type='block' device='disk'>
    <driver name='qemu' type='raw' cache='writeback'/>
    <source dev='/dev/disk/by-id/ata-OCZ-VERTEX3_OCZ-W02R60UNR99A384T'/>
    <target dev='hdb' bus='sata'/>
</disk>
Once all this is done, you should be able to boot into your Unraid VM and start allocating disks…
APPENDIX 2 – Updating Unraid
To update Unraid the built in updater won’t work, just as it didn’t in ESXI (I believe).
Instead shutdown the VM and create a mount point on your array I chose to create a folder called .unraid-vm in my /mnt/cache (I put a period in front of it so that Unraid won’t move it to my array)
mkdir -p /mnt/cache/.unraid-vmThen run this command on your unraid-vm.img
fdisk -l /path/to/unraid-vm.imgYou should see something like this
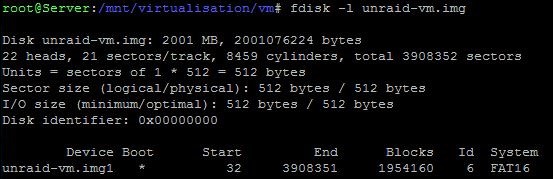
Take the start number, in my case it’s 32 and multiply it by 512 to get your offset, mine is 16384 (32 x 512)
mount -o offset=16384 /path/to/unraid-vm.img /path/to/.unraid-vmwhich in my case is
mount -o offset=16384 /mnt/virtualisation/vm/unraid-vm.img /mnt/cache/.unraid-vmNow you should be able to browse to /.unraid-vm and, from there, update bzroot & bzimage manually…
Once you’ve finished, ensure you’ve closed all windows to /.unraid-vm and run
umount /path/to/.unraid-vmAPPENDIX 3 – SSH Keys
I’ve noticed that the SSH keys normally created on first boot aren’t done on this install. To get around this is pretty simple. Just create a Unraid USB install and boot it from any machine you have. Give it 30 seconds or so to allow for the SSH keys to be generated then copy them across to /boot on your VM. I did this over the network, but no reason why you couldn’t remove the USB Stick.
APPENDIX 4 – Final Touches
We’re all a sucker for eye candy, so download the icon from here and put it in your /boot and run
cp /boot/lime.png /usr/local/emhttp/plugins/dynamix.vm.manager/templates/images(This line can be added to your go file to make it persist across reboots)
then edit your xml one more time and change this line to read as so
<vmtemplate name="Custom" icon="lime.png" os="slackware"/>You’re all ready now to boot up your new UNRAID-VM
I’ve personally been using this for a week or so now, but needless to say it should be considered experimental and I think far more testing needs to happen before anyone should even contemplate trusting a setup like this with their data.