Tvheadend is a comprehensive and full-featured piece of software that readily transforms your perception of TV and how it is accessed. However, this comprehensiveness comes at a price - epic levels of configuration. For those that have only just started looking at this as a solution, here is a guide on how to go from nothing to a readily served Freeview source on your home network.
Get the software
While Tvheadend is available in the apt repositories, or via their GitHub page, I wouldn't be doing my job if I didn't recommend the use of our docker image. It packages everything up nice and neatly in to a ready to use bundle.
docker create \
  --name=tvheadend \
  --net=bridge \
  -v <path to data>:/config \
  -v <path to recordings>:/recordings \
  -e PGID=<gid> -e PUID=<uid>  \
  -p 9981:9981 \
  -p 9982:9982 \
  --device=/dev/dvb
  linuxserver/tvheadend
This will pull the latest built version of our image. For a specified stable version of Tvheadend, see our Docker Hub tags.
Veteran users of our images won't see anything particularly new here, with the possible exception of the --device flag. This allows the container to access the DVB card directly. In order for the application to use the card, ensure the mount permissions on the host machine are the same as the PUID or PGID. Generally speaking, the card will be mounted under root (during the boot process), so it is best to chown -R the card to match the user you use when creating the container (in my case: chown -R josh:josh /dev/dvb).
Configuring Tvheadend
Language Settings
When you start the application for the first time (docker start tvheadend) you'll be prompted to fill in some initial information, such as your language of choice:
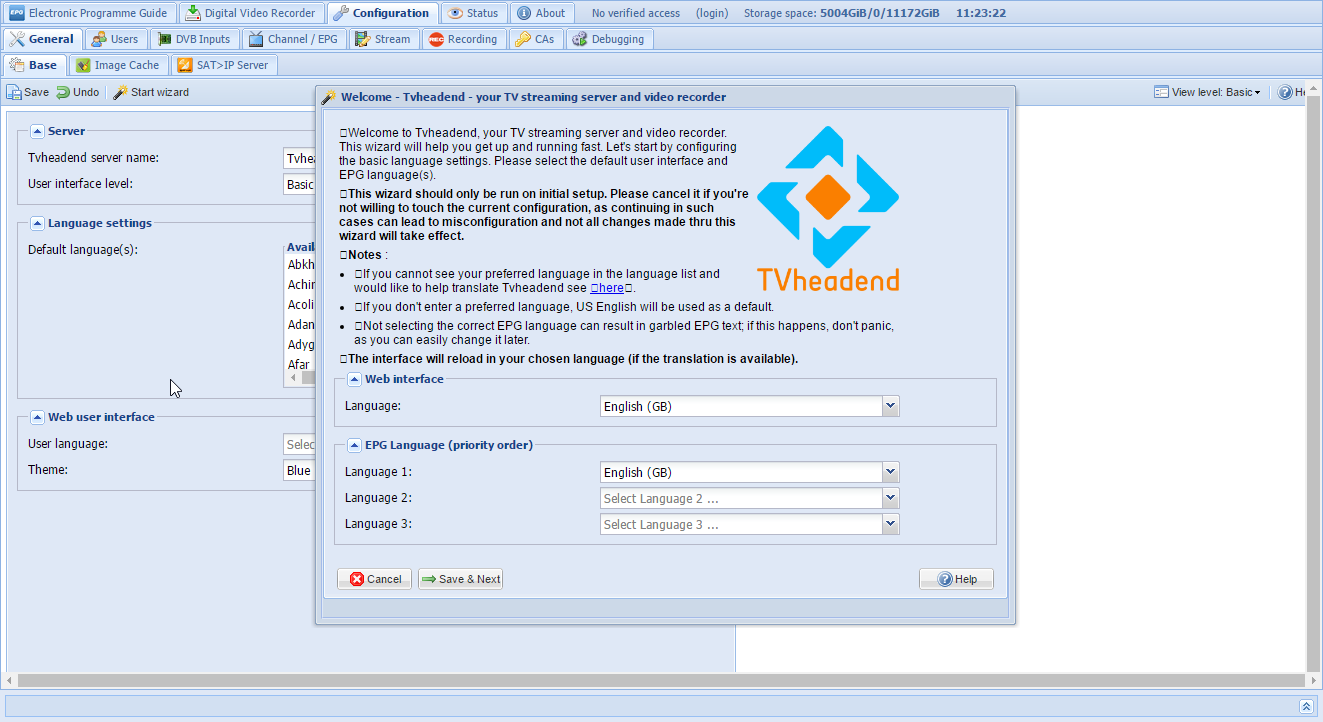
Click on Save & Next It may refresh to the same pop-up - if it does, just click next again.
Credentials
You'll then be asked to fill in some user credentials for the application. This will apply to both the web UI and client access. In my case I did not worry about this as I'm not overly concerned about security of my TV streams on my network. However, it is recommended to fill in at least a basic user (do as I say, not as I do, and all that).
Click Save & Next.

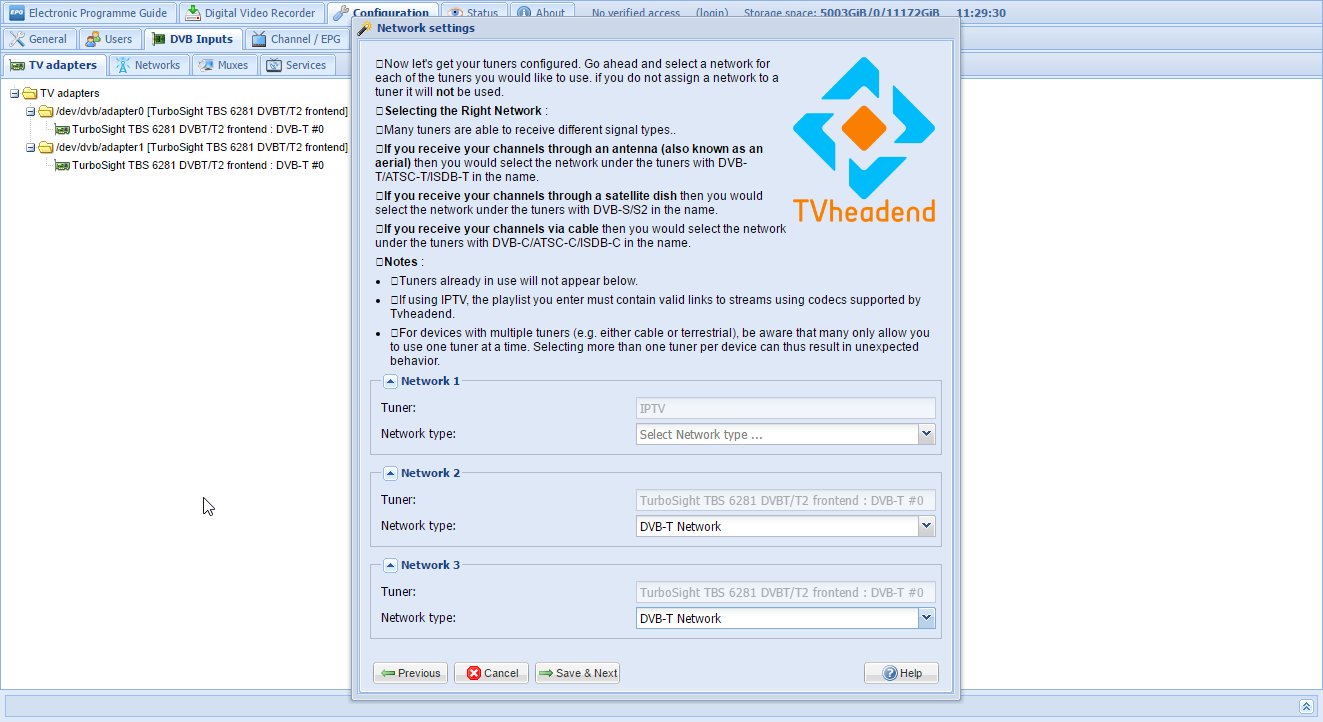
Networks
Now Tvheadend is ready to configure your DVB-T(2) card. Assuming the card has been both mounted correctly and passed through the docker container, you should come across some available networks. A network is just a carrier definition of the kind of TV source your card(s) receive. Usually IPTV is defaulted in Network 1, but we're not dealing with this, so just ignore it. Networks 2 and 3, however are linked to my card (it is a dual tuner, so two networks appear). Under Network Type for both, select "DVB-T Network" and hit Save & Continue.
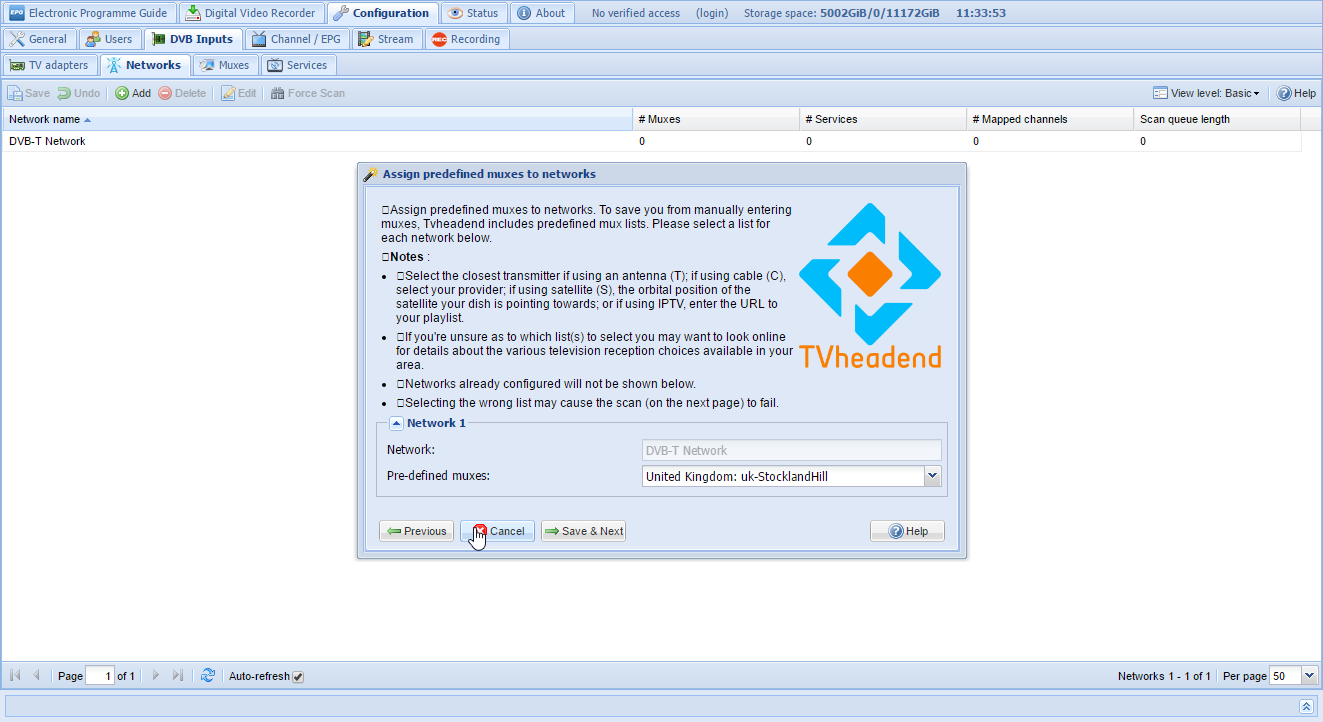
Muxes
Muxes are the frequencies that actually carry the stream data across the air. This step is incredibly important to get right, especially with DVB-T networks, as each regional television transmitter sends data over different frequencies. Thankfully, Tvheadend comes with a predefined list of most (if not all) European muxes.
How do I find out my mux?
Your mux will depend on your regional location in the country. For example, I live in the South West of England, which is served by six DVB-T transmitters. You can find out which specific transmitter is yours by going to this website and clicking on the pin closest to where you live. My transmitter is called Stockland Hill, so I searched for it in the Pre-defined muxes dropdown and selected it.
If you live in an area where two or more transmitters are equidistant from you, have a look at their coverage by clicking on each one individually. Some transmitters are lower power, so serve a smaller number of houses. A good example of this is in the Leeds area, where the Idle transmitter is only 50W, serving Bradford, compared to the Emley Moor transmitter, which is 174,000W, serving Leeds, York and Doncaster. In this case, you may be closer to the former, but the latter would provide a much better signal.
What happens if I select the wrong mux?
Simply put, Tvheadend will use the DVB card to scan for muxes on the wrong frequency. You'll either end up with very few services, or none at all.
It'll automatically perform a scan based on your transmitter's frequencies and obtain its services. This can take several minutes to perform, so give it a chance to complete.

Click Save & Next.
Mapping Services
Note how "channels" haven't been mentioned yet. We're almost there. A service is an individual stream of data that is sent over a mux (muxes have multiple services in them). A service can be many things - TV data, digital radio, text information - so in order for them to be usable, we need to map them to channels.
On the Service mapping modal, select all three options and click Save & Next. This will take the raw service data and map it to each readable channel (i.e. BBC1, ITV, Food Network, etc).
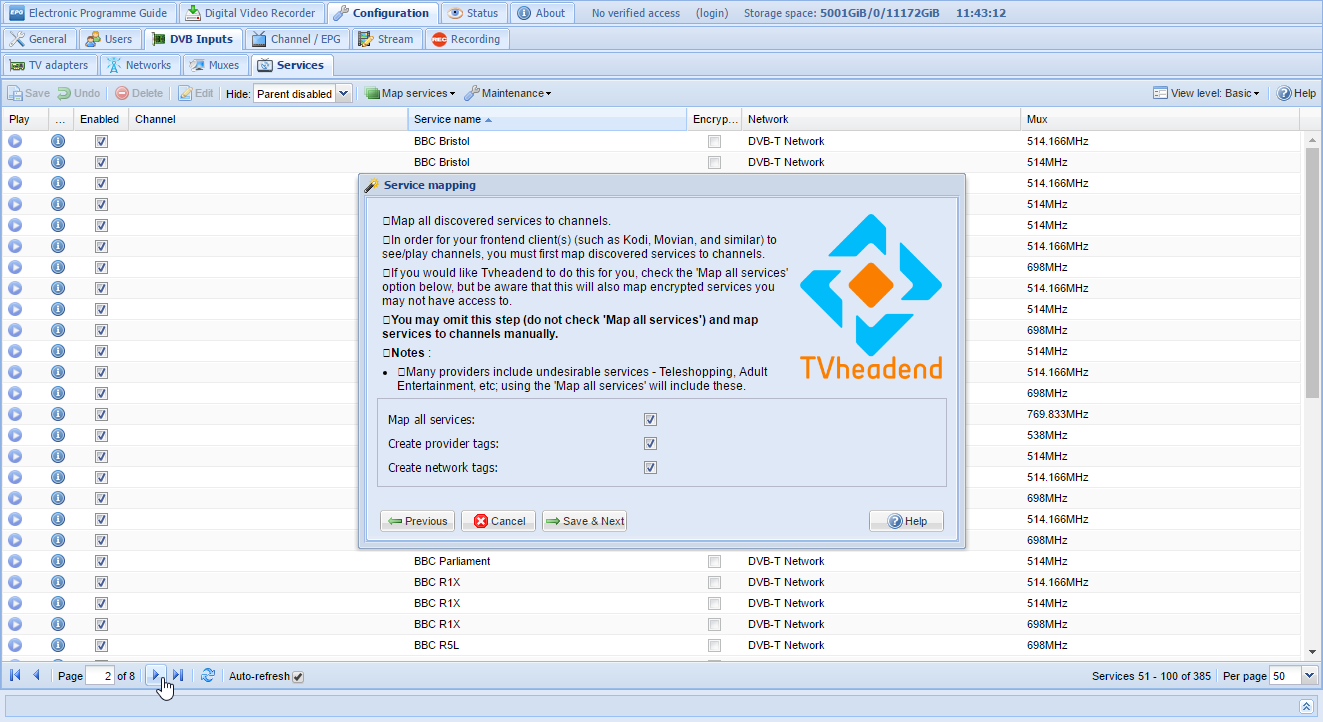
Now you can finally click Finish.
Menu Configuration
Tvheadend's menu system is relatively simple to navigate. The master options are on the top row, changing the second row, which in turn changes the third row. By default, Tvheadend's menu is set to Basic. For the following steps it will be much easier if we expand this to Expert. Go to Configuration -> General -> Base and ensure the following is set:
-
Server
-
User interface level:
Expert
Then click Save in the top left corner.
Channel Cleansing
If you live in an area where the signal of multiple transmitters overlaps and is within a fair range tolerance, you'll likely find that you pick up duplicate channels (one for each transmitter).
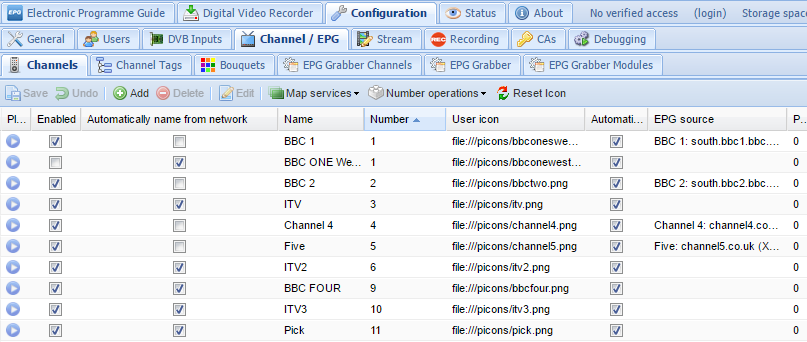
To cleanse your channel data, go to Configuration -> Channel / EPG -> Channels. Here you'll see the duplication (if any). Notice below how I get three versions of BBC One: BBC One West, and BBC One S West (twice). The first is from the Mendip transmitter in Somerset. The next two are likely from the Stockland Hill transmitter (my closest one, and my preferred choice).
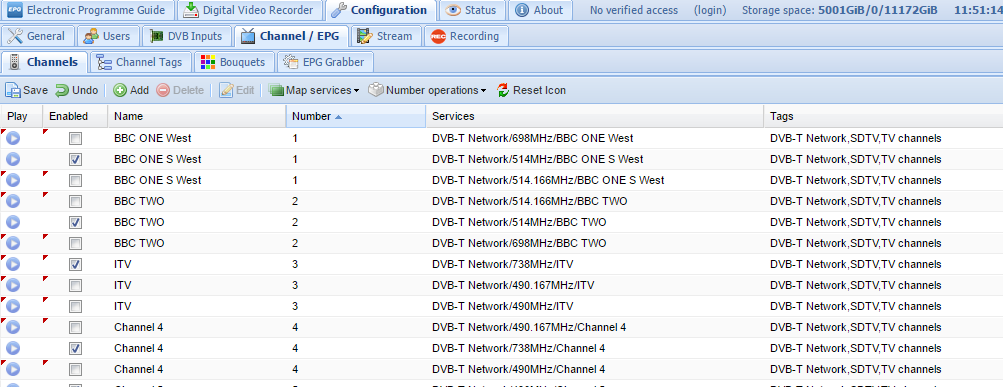
How do I know which duplicates to untick?
This is generally down to preference - however a basic understanding of radio waves helps. Higher frequencies are able to transmit much more data than lower frequencies. Unfortunately the trade-off for this is that it doesn't travel as far, meaning you won't receive higher frequencies if you're on the edge of your transmitter's range. So, if you're close to your transmitter (relatively speaking), try keeping the higher frequencies ticked. If you're far away, favour the lower frequencies. You may suffer slight quality degradation but the signal will be much stronger.
If you live in a valley or a heavily built-up area, you may find the lower frequencies better due to its ability to permeate more easily through solid objects (due to the lower wavelength). Likewise, if you live on the top of a hill, with clear line of sight in many directions, the higher frequencies will work just as well.
Have a look at your area and see which frequency is best for you.
Configuring the EPG
What TV stream is complete without a programming guide to go with it? Tvheadend provides a great variety of ways to obtain guide data via its EPG Grabber Modules, listed under Configuration -> Channel / EPG. There are three kinds of EPG modules: External, Internal and Over-the-air, and you can use as many as you like. I have opted to use two Internal sources (via XMLTV) and one Over-the-air source. The term "Internal" just means that it is something configured within Tvheadend itself.
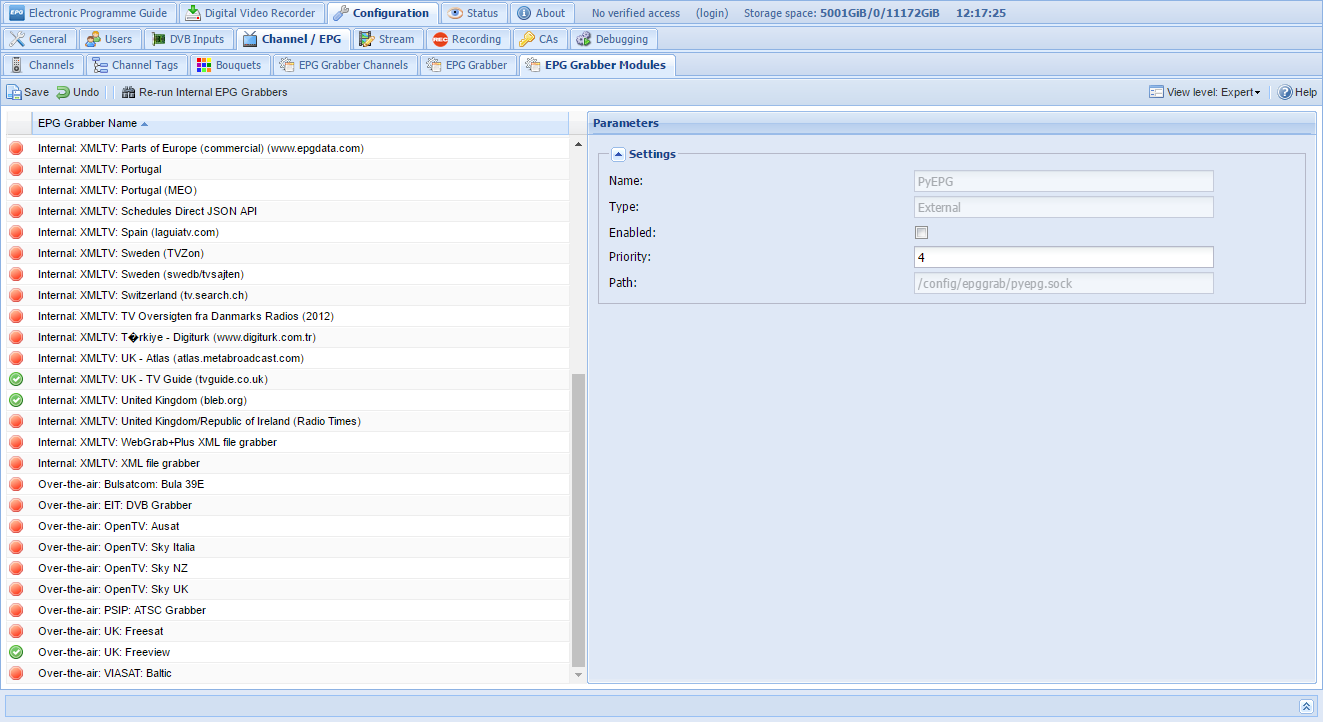
Enabling an Internal EPG module
Each internal module requires configuration as they will be using different sources - you need to define which channels to get data for. Before enabling an internal module, first click on it and make note of the Path: as you'll need it to run the following command:
docker exec -it -u abc tvheadend /usr/bin/tv_grab_uk_tvguide --configureThe above will run the configuration steps for "Internal: XMLTV: UK - TV Guide (tvguide.co.uk)". Once this step has been completed, you can tick the Enabled box and Save. Do this for as many modules as you want.
Reconfiguring the Over-the-air module
Depending on your DVB-T source, you may wish to change which Over-the-air module you have enabled. I only have one - "Over-the-air: UK: Freeview" - as it directly maps to the services I am interested in.
Mapping EPG data to specific channels
If you want to be even more specific with your EPG, you can also map available EPG data to certain channels, under the EPG Grabber Channels menu item. Different EPG grabbers will provide different channel data, so some may provide data for one channel, while others won't (a good argument to have multiple modules enabled). This page can let you specifically choose which module sources are linked to which channels (note the Path, Name and Channels headers):
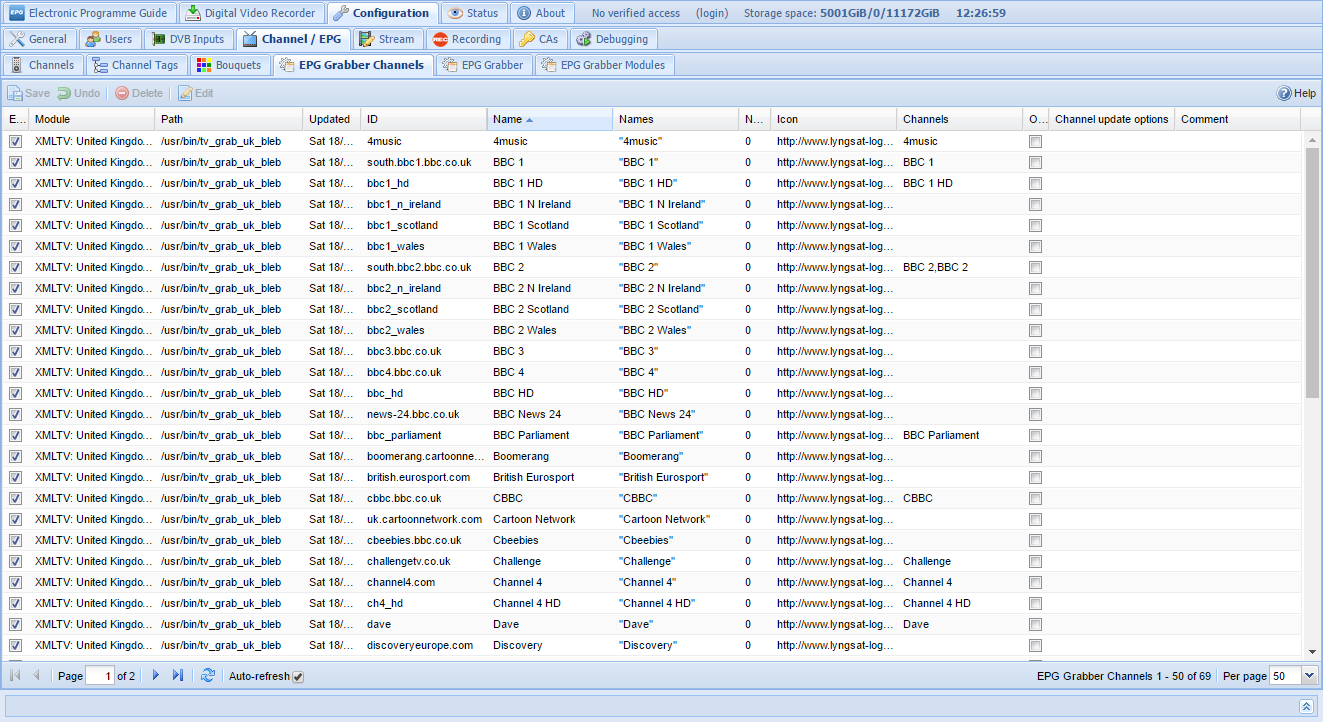
These behave as overrides - don't feel like you must do this for all of your channels.
Configure when Tvheadend scans in the EPG
The EPG is not live data. Tvheadend will periodically scan the enabled EPG modules and retrieve more up-to-date channel information. Under Configuration -> Channel / EPG -> EPG Grabber ensure Tvheadend is configured to save the data to disk every hour. You can also change the frequency of Internal and OTA scans (I'm personally quite happy with scans twice a day).
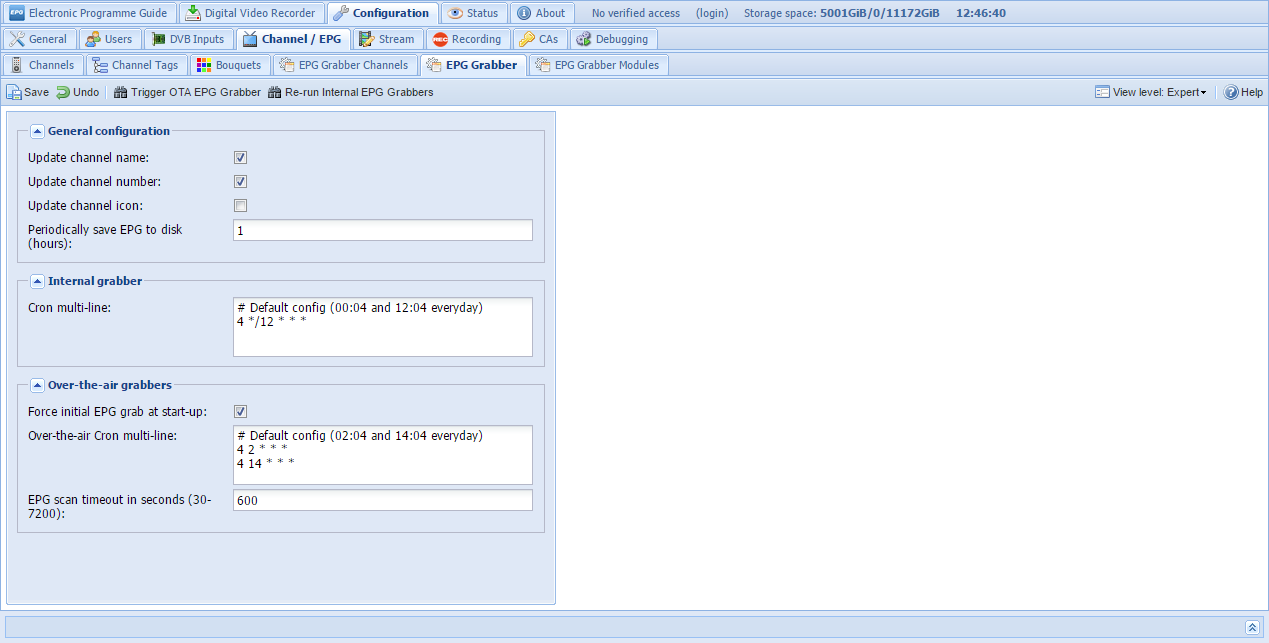
You can of course manually kick off EPG scans by clicking on Trigger OTA EPG Grabber or Re-run Internal EPG Grabber. Bear in mind that any scan is not instant. It can take many minutes before a change is apparent.
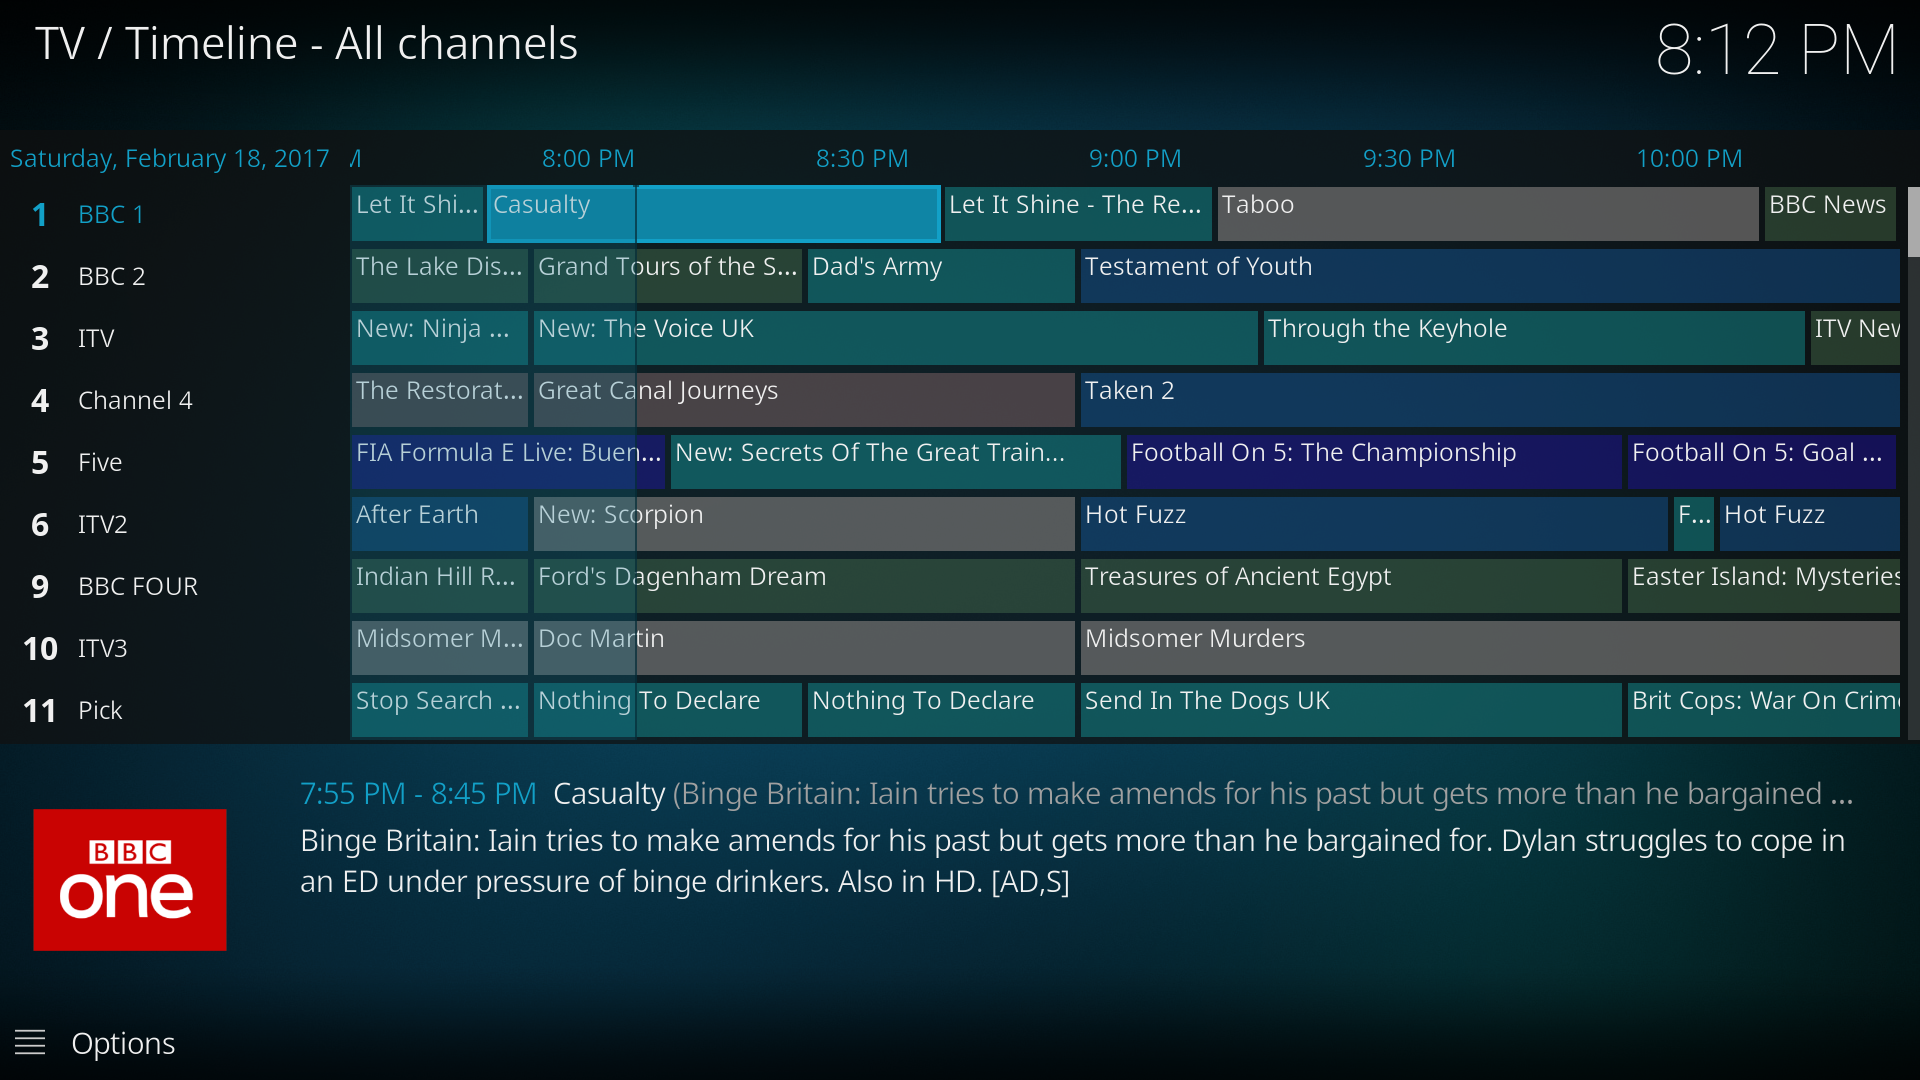
Having a complete EPG really adds to the overall experience, especially with a client that supports it. Here's what Kodi looks like:
Picons
Picons are program icons that give a great visual cue to the channels when you are listing them or viewing the EPG. Our docker image comes with a pre-packed list of icons provided by the PICONS team that cover almost every channel on the DVB-T and DVB-S network.
Go to Configuration -> General -> Base and ensure the following is set:
-
Picon
-
Channel icon path:
file:///picons/%C.png -
Channel icon name scheme:
Service name picons -
Picon path: BLANK
-
Picon name scheme:
Standard
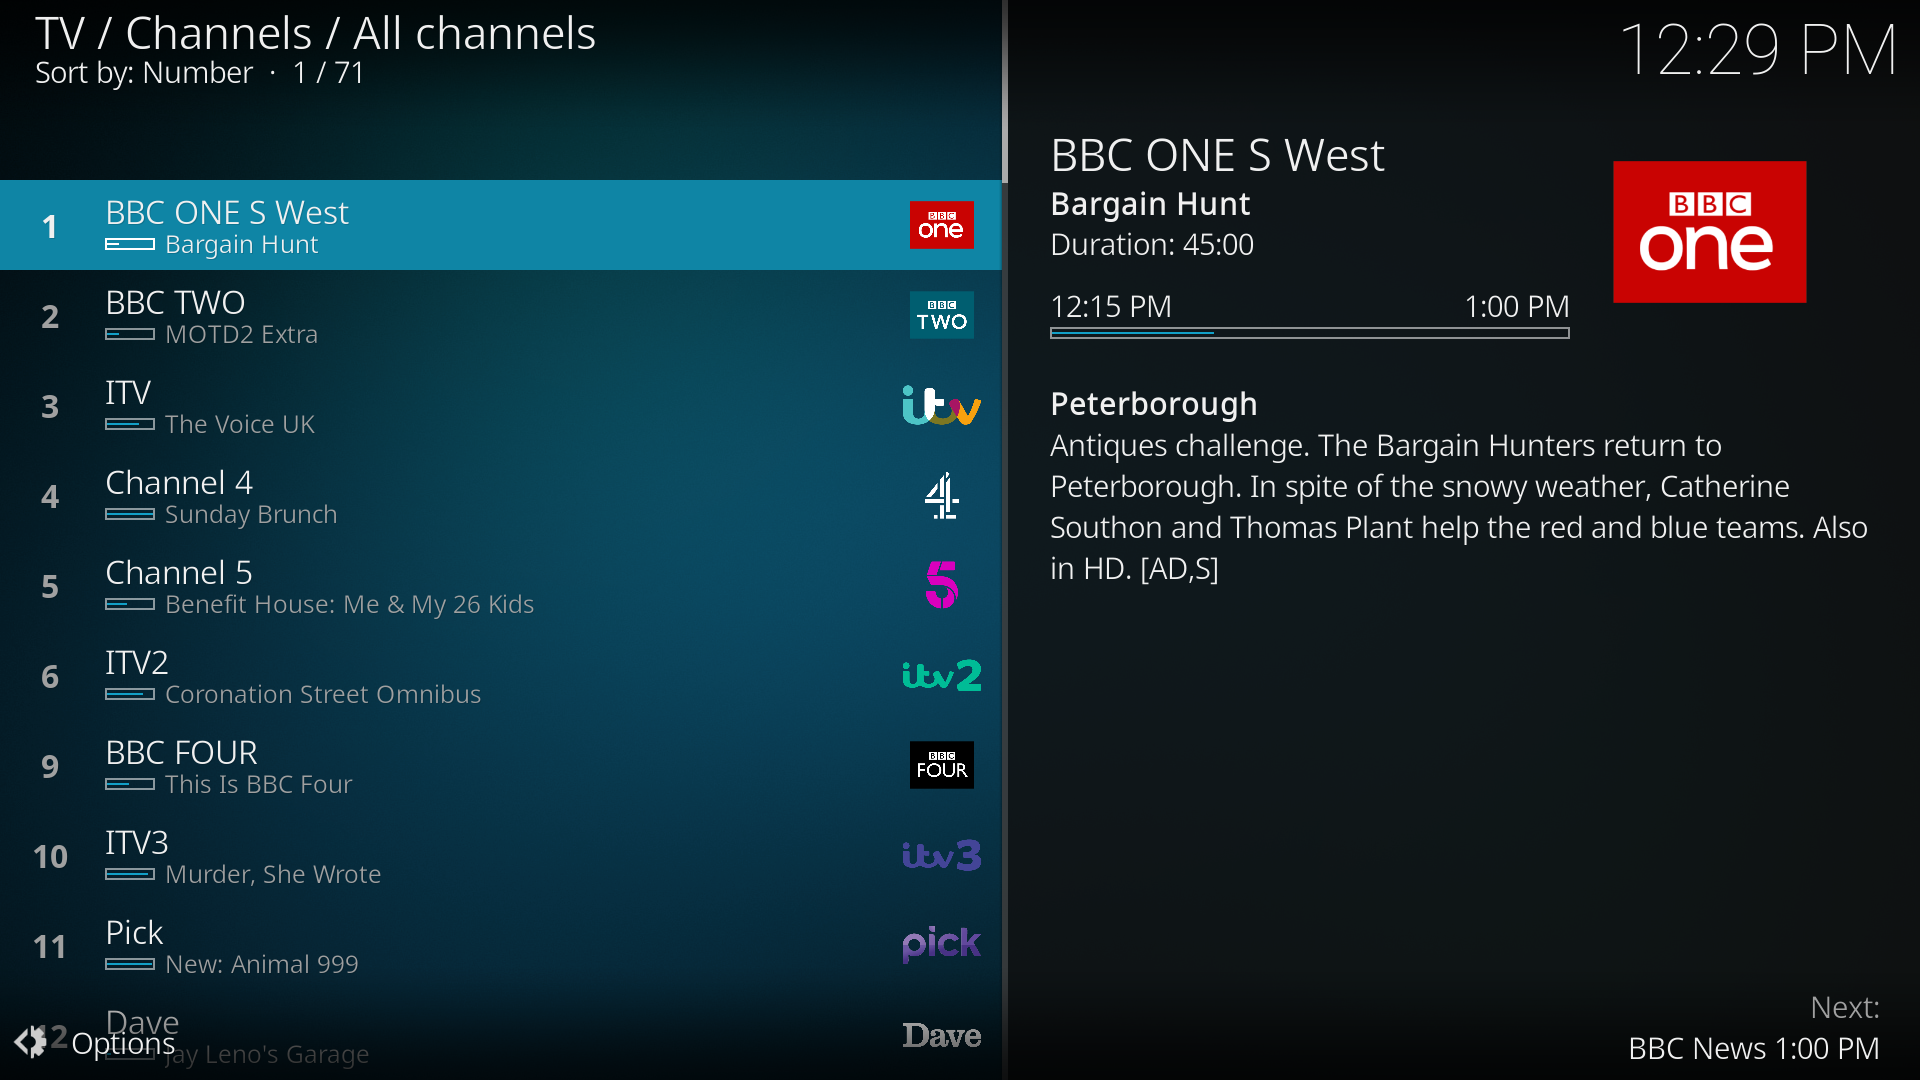
The Channel icon path will use the common name of the channel and evaluate it based on the %C in the path. It will then serve the image at that path to clients of the Tvheadend server, such as Kodi:
Some of my channels aren't showing picons!
There are two reasons for this - first is that the %C channel name is different to the picon we have available in our image, and the second is that we don't have the image at all. If your issue is the former, you can fix this by changing the path next to the channel manually, and point it to the correct image.
You can do this by shelling into the docker container and listing all of the available .png picon files, looking for the channel's image:
docker exec -it tvheadend /bin/bash

ls -l /picons
In both cases, please let the Picon team know in a Github Issue and they can look into it.
Recordings
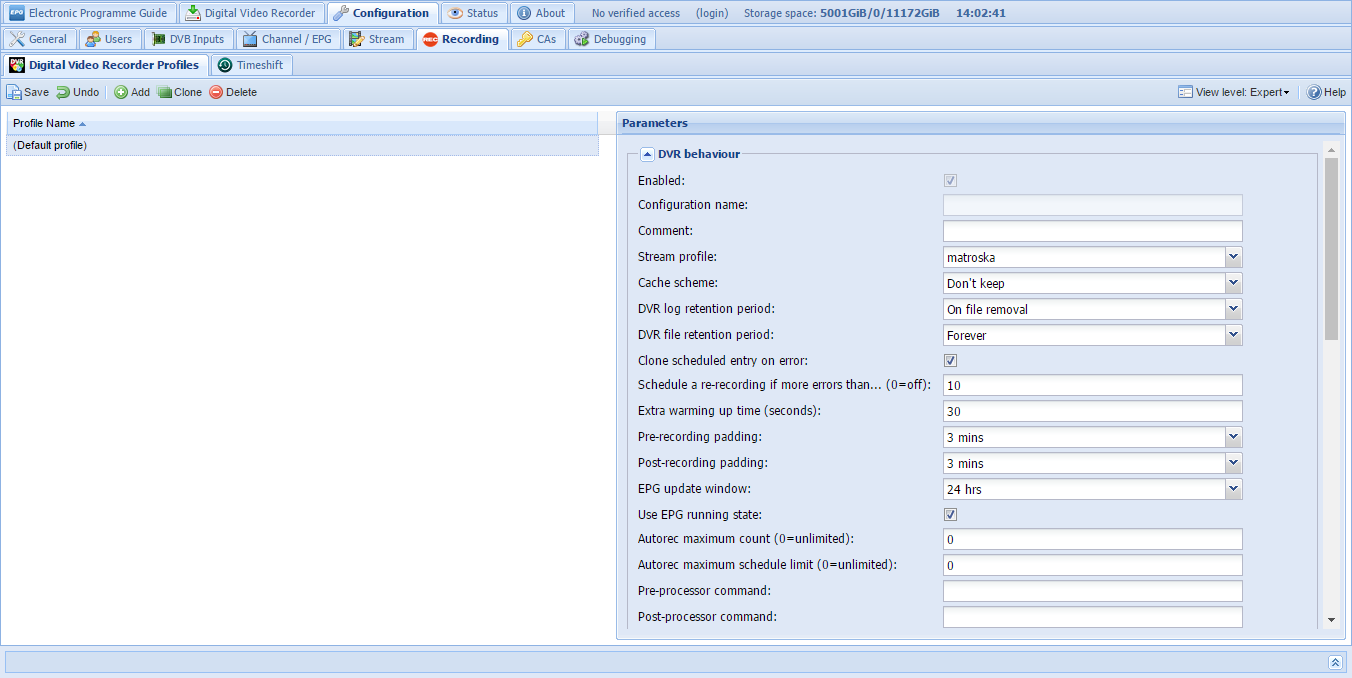
For a truer DVR experience, you can also enable the Recording and Timeshift functionality of Tvheadend, both found under Configuration -> Recording. There is a Default profile for recording, which can be configured to your tastes. I recommend changing two aspects:
-
DVR behaviour
-
Stream profile:
matroska -
Pre-recording padding:
3 mins -
Post-recording padding:
3 mins
The Stream profile means that recordings are remuxed to a particular video container. By default, the pass profile will store videos in the standard MPEG-TS format. These files can be rather large, so to help save storage space, use MKVs instead. There will be a slight hit to CPU usage while recording when using anything other than pass due to the remuxing. Of course, if you have the storage to spare, just use pass.
The pre and post-recording padding settings merely tell the recorder to start recording a few minutes before the allotted start time of the show, and stop a few minutes after. This helps ensure you get the whole episode in the recording as some channels can overrun their broadcast time.
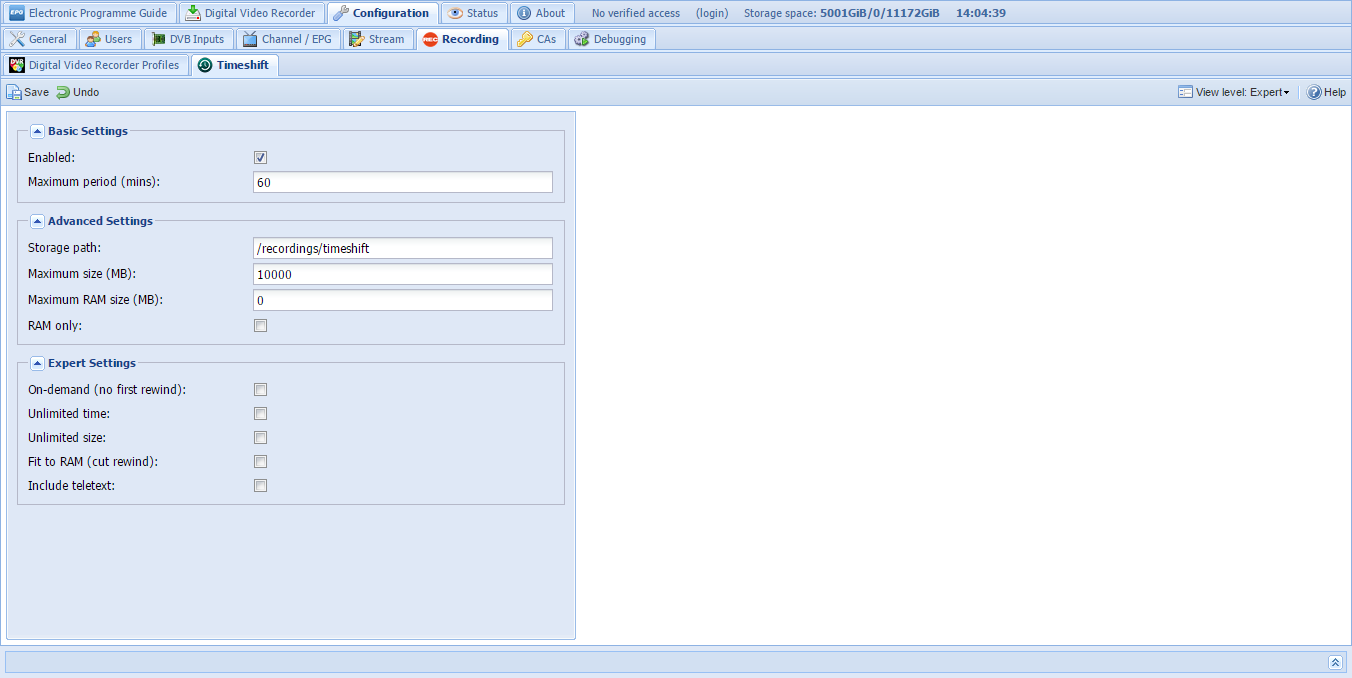
Timeshift
Timeshift gives your clients the ability to pause and rewind live TV. Still slightly rough around the edges, this feature may or may not be useful to you. Under the Timeshift tab, enable it, set a location for the timeshift buffer to be stored, and Save. I set my timeshift buffer to /recordings/timeshift as it keeps everything all in one place.
Get the Android app
There's a great Tvheadend client application for Android which allows you to connect to the server and view its running status, see channel listings, and even watch TV (it'll use the default player on your device). It's quite a handy thing to have.
Summary
And there we have it. By this point Tvheadend should be configured with all of your desired channels, EPG guides, and icons. Your clients can now connect to it and receive streams of your favourite channels.