
The Perfect Media Series has a new home at perfectmediaserver.com. This series remains public here for informational purposes only - for questions or support please visit the new site.
It's been almost 18 months since my original article in 2016 on the 'perfect' media server - this article assumes you've read that one for background on the software we're about to install. It still proves a very popular piece so I thought it about time to update the article where appropriate and give some further information on how you can put this setup together yourself. And as if I needed further excuses, Debian just released version 9 so now is a great time upgrade / switch.
edit: Sept 2017 - We have just launched a Discord server. Head on over for support and to ask any questions!
Following up on extensive feedback to the original post in the past 18 months I will this time, explain how you can actually set up all the required software yourself - without any real previous knowledge of scripting tools like Ansible (which I still highly recommend and personally use, by the way!).
The core tenet of using only Free Open Source Software wherever possible still remains in place from before. As do the original requirements in the 2016 article. It is not only free as in beer, but none of the software used requires you to pay a single penny to get up and running - it is completely free.
The verdict... (after 18 months)
I touted the solution I last wrote about as 'flawless'. Ok, that might be a bit rich but honestly nothing major has needed to change since the original article. The system is put together on top of Debian 9 (Stretch), docker, snapraid and mergerfs.
This is a system I can leave running for months at a time without needing to look at it. My current uptime is 68 days. Those who know me, know this is ridiculous for my home server. Debian is absolutely bullet proof, docker encapsulates the 'risky' applications into safe sandboxes, mergerfs just works and snapraid too.
Something must have changed in 18 months, right? Yes, actually. I've switched to docker-compose for managing my containers. It's just so convenient. One single file defines the 10-15 or so containers on my system at any one time and I have created aliases meaning the snappy command dcrun up -d is all that's required to start all the applications - more on docker-compose later though.
Comprehensive Installation Guide
Last year, I extolled the virtues of Ansible and automation. Whilst I think this is a great solution, many of the readers here might find these topics a little too advanced (you should still totally check out Ansible, it is awesome and will save you time in the long run). Therefore, I'm going to attempt to do a beginners guide to building a DIY NAS over the remaining course of this article.
I'll cover installing Debian, docker, mergerfs and snapraid plus show you the basics of using docker-compose to manage your containers. Plus some new goodies such as cockpit project and Portainer.io to provide web UIs for server and container administration - a common (but in my opinion unnecessary) request. I'm not an animal though so I'll listen to the feedback and include these projects here.
There are several parts to the YouTube playlist, they correspond to sections below accordingly!
Install Debian
Disclaimer: Disconnect your data drives before installation - just incase!
This is the first and most essential part to get right. Installation of Debian is quite straightforward as the installer has a UI which is click, click, click done. Make sure to unselect the debian desktop environment, it's unlikely you really want this on a headless file server. Pay particular attention to the partitioning step as this cannot easily be changed after installation without wiping and starting again.
See the attached YouTube video for more info on this step if you're new to installing Linux.
Debian just released "Stretch", version 9 (their releases are named after Toy Story characters). Feel free to use "Jessie" as well as most things should be the same.
There are a bunch of post-installation house keeping tasks you might wish to perform such as setting up ssh keys, installing any packages you might like and configuring users or anything on the system to your preference.
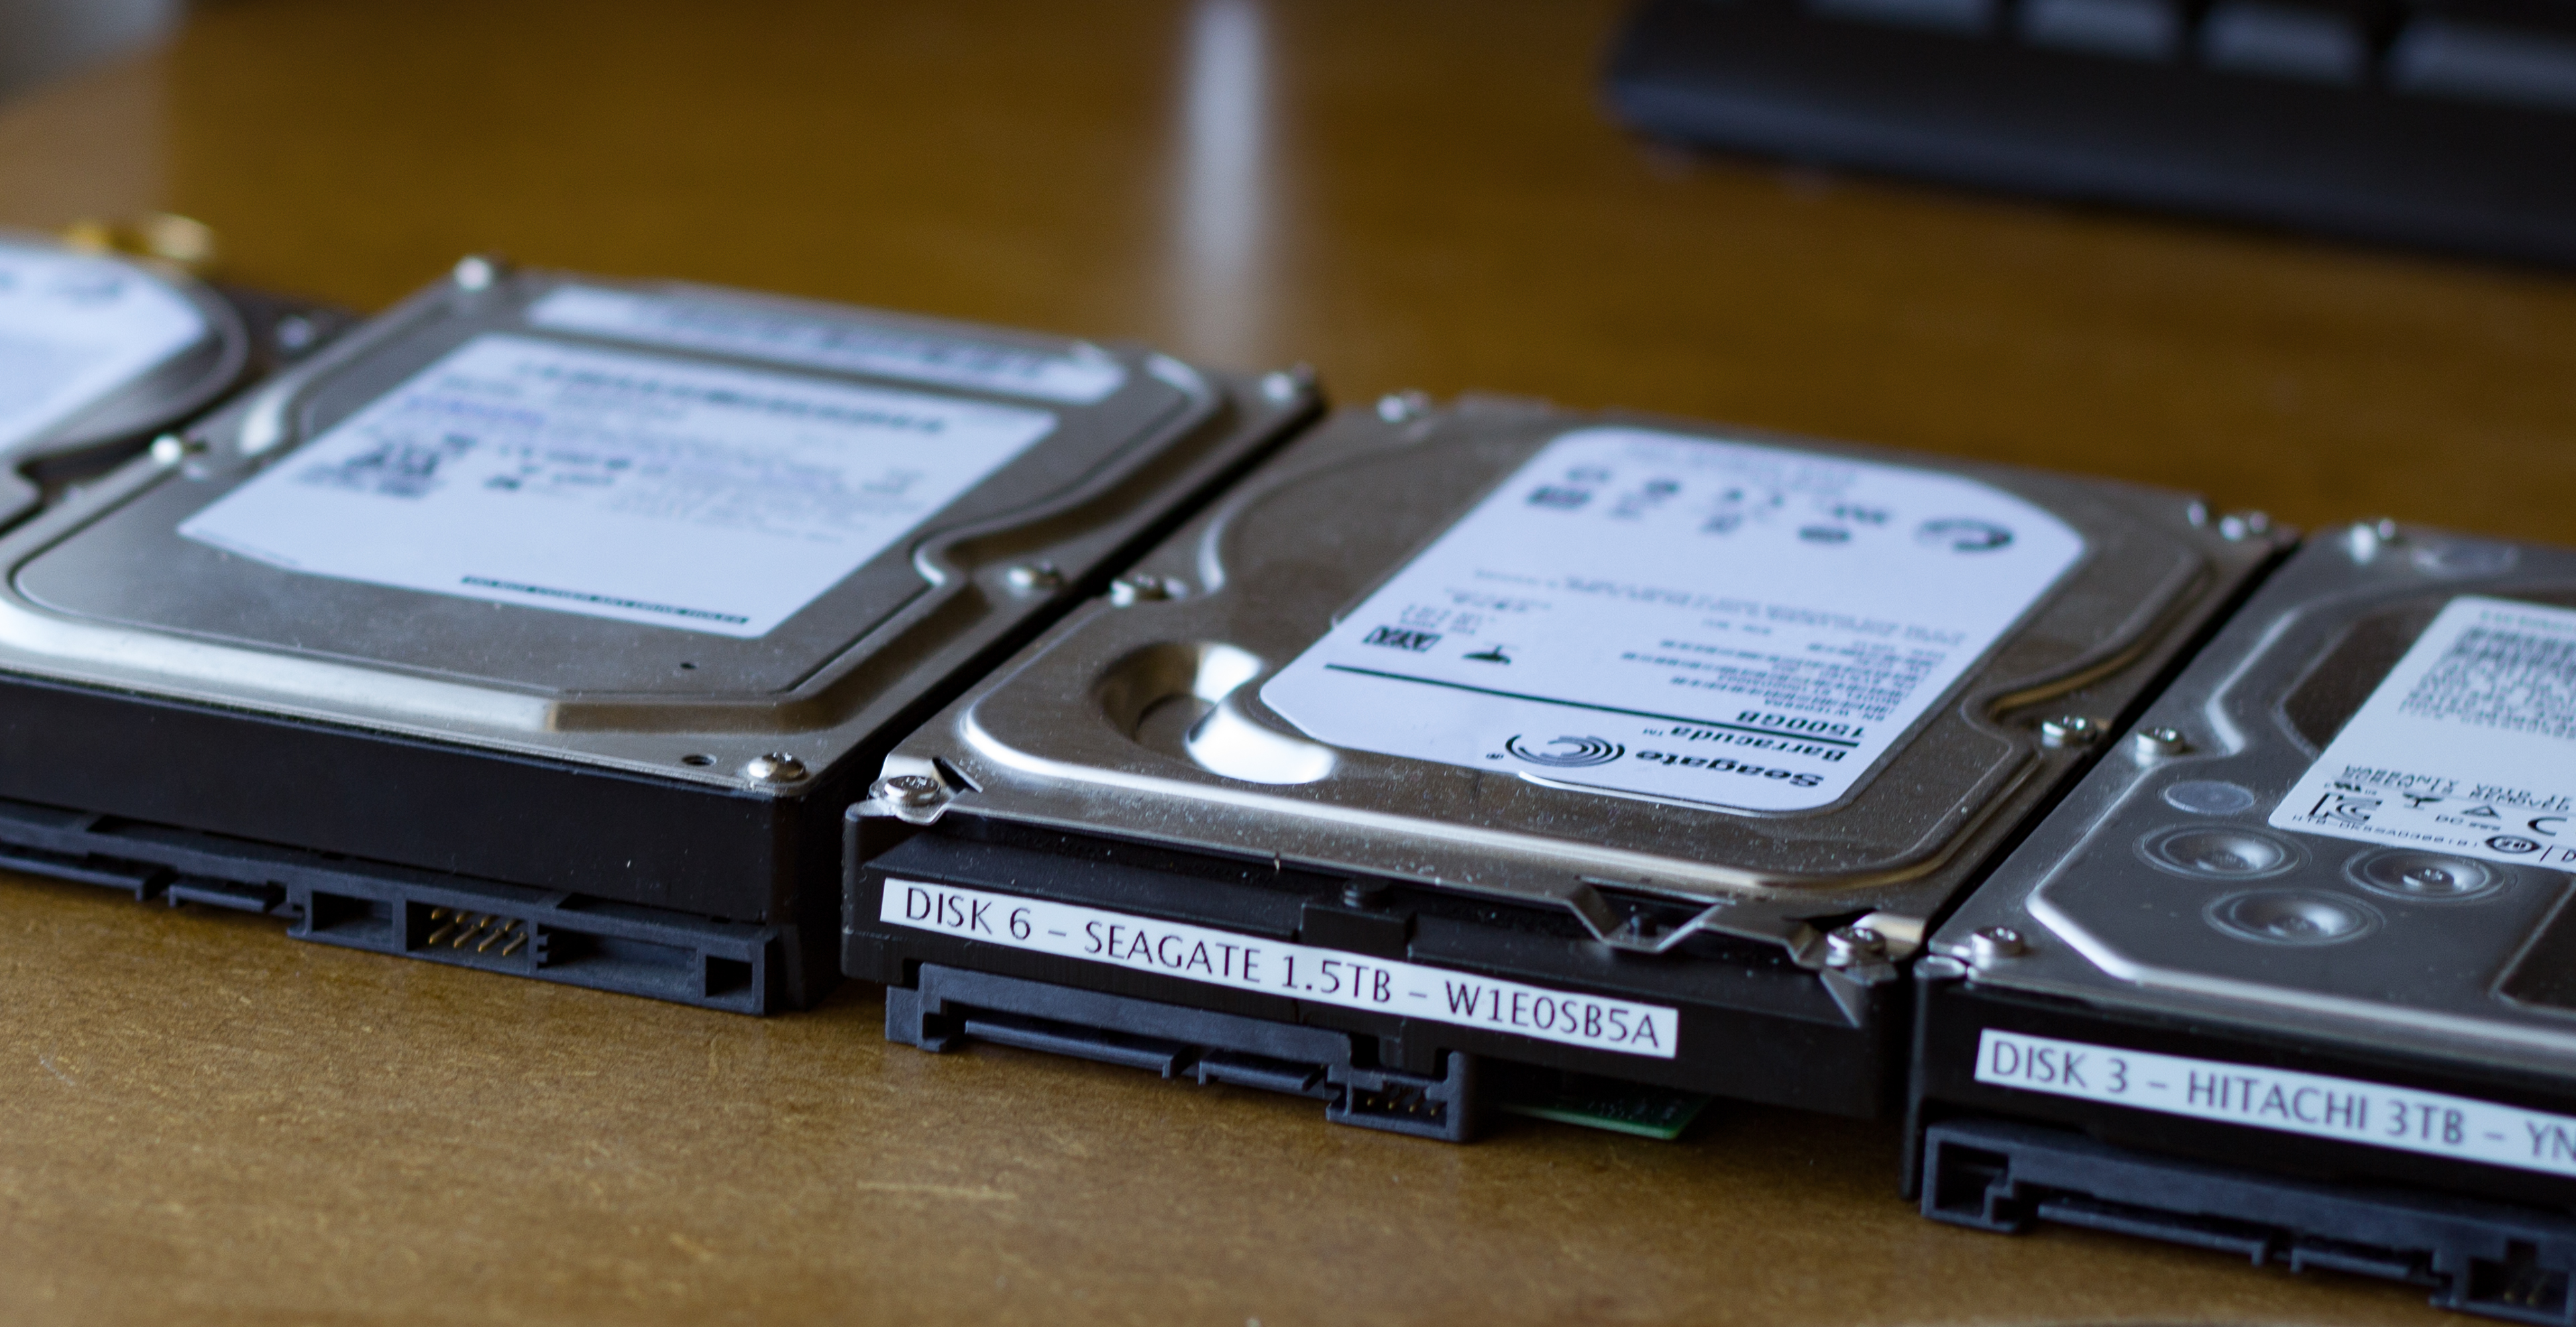
Setting up the drives using MergerFS
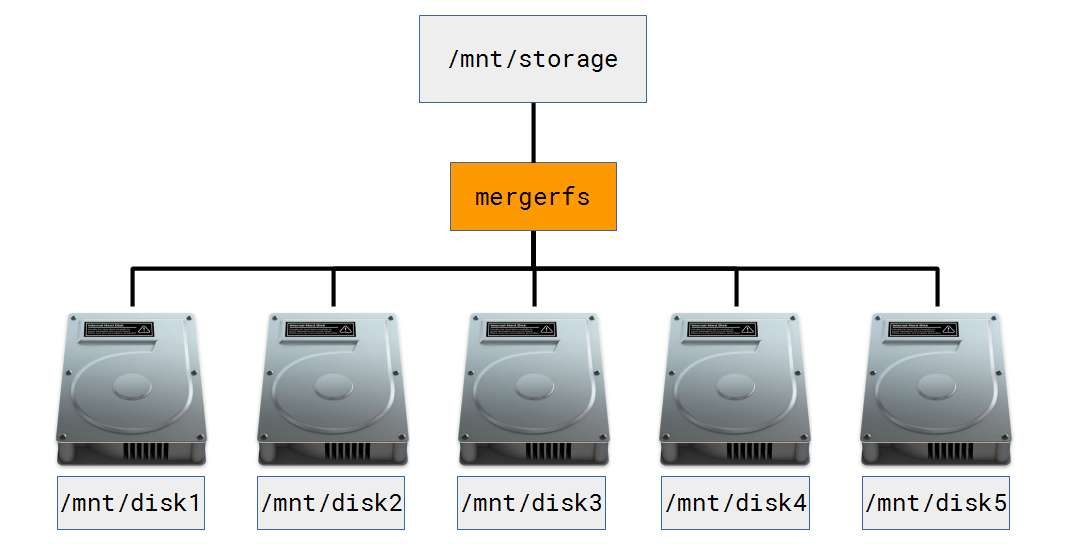
In this section, we'll cover how to make Debian aware of which hard drives you want to use for what purpose in your system. We'll use MergerFS to provide a single way to pool access across these multiple drives - much like unRAID, Synology, Qnap or others do with their technologies.
To recap: MergerFS allows us to mix and match any number of mismatched, unstriped data drives under a single mountpoint. I do provide a full explanation in the 2016 article, please go there if you want more information. The important difference between MergerFS and traditional RAID is that the data is not striped thus increasing the likelihood of you being able to recover data in the event of a disk failure.
MergerFS installation
As of Debian 9 MergerFS is now in the main repositories (congrats to trapexit, the mergerfs dev on this!). The version in the repos is a little behind the version available on Github. You have two options at this point:
-
Option 1 -
apt install mergerfs fuse -
This option will auto update with the rest of your system when new versions of MergerFS are made available in the repositories 'upstream'
-
Option 2 -
wget https://github.com/trapexit/mergerfs/releases/download/*/mergerfs_*.debian-stretch_amd64.deb && dpkg -i mergerfs*.deb -
This option will require you to manually update Mergerfs with
.debfiles from Github (you also need to installfusefrom apt)
Unless you have good reason, pick option 1.
Mount point creation
Next you must create mount points for each individual data disk you wish to mount and a mount point to 'pool' the drives under (in the picture above, this is /mnt/storage). We must also create a mount point for the snapraid parity drive - more on this later.
mkdir /mnt/disk{1,2,3,4,5}
mkdir /mnt/parity{1,2} # adjust this command based on your parity setup
mkdir /mnt/storage
Create fstab entries
Next we need to create an entry in /etc/fstab. This file tells your OS how, where and which disks to mount. It looks a bit complex but an fstab entry is actually quite simple and breaks down to <device> <mountpoint> <filesystem> <options> <dump> <fsck> - documentation here. We first need to find the required information (don't forget to look at the accompanying YouTube video if you're confused at this point!) and so we must run some commands...
ls /dev/disk/by-id
...
ata-Hitachi_HDS5C3030ALA630_MJ1311YNG5SD3A
ata-TOSHIBA_DT01ACA300_X3544DGKS-part1
ata-Hitachi_HDS5C3030ALA630_MJ1311YNG5SD3A-part1
ata-WDC_WD30EFRX-68AX9N0_WD-WCC1T0632015
...
Depending on how many drives you have here, this might end up being quite a lot of text. You must identify the partition you wish to mount (probably it'll be the part1 lines) and put that into your /etc/fstab file. If haven't created a partition on your drives yet (i.e. they are new) then use gdisk to do that - instructions here. Here is my finished example file.
Note: do not modify the existing contents of this file else your system might not boot, just add your stuff at the end.
# drive entries below abbreviated for formatting purposes
/dev/disk/by-id/ata-WDC_WD60...449UPL-part1    /mnt/parity1   ext4 defaults 0 0
/dev/disk/by-id/ata-WDC_WD60...V3-part1        /mnt/disk1     ext4 defaults 0 0
/dev/disk/by-id/ata-Hit...11YNG5SD3A-part1     /mnt/disk2     xfs  defaults 0 0
/dev/disk/by-id/ata-WDC_WD...32015-part1       /mnt/disk3     xfs  defaults 0 0
/dev/disk/by-id/ata-TOSH...3544DGKS-part1      /mnt/disk4     xfs  defaults 0 0
/dev/disk/by-id/ata-WDC_WD...074096-part1      /mnt/disk5     xfs  defaults 0 0

/mnt/disk*     /mnt/storage     fuse.mergerfs direct_io,defaults,allow_other,minfreespace=50G,fsname=mergerfs 0 0
I'm assuming you can fill in the correct variables for the correct drive. Note that the only caveat above is that your parity drive must be the largest or as large as your largest disk in the snapraid array.
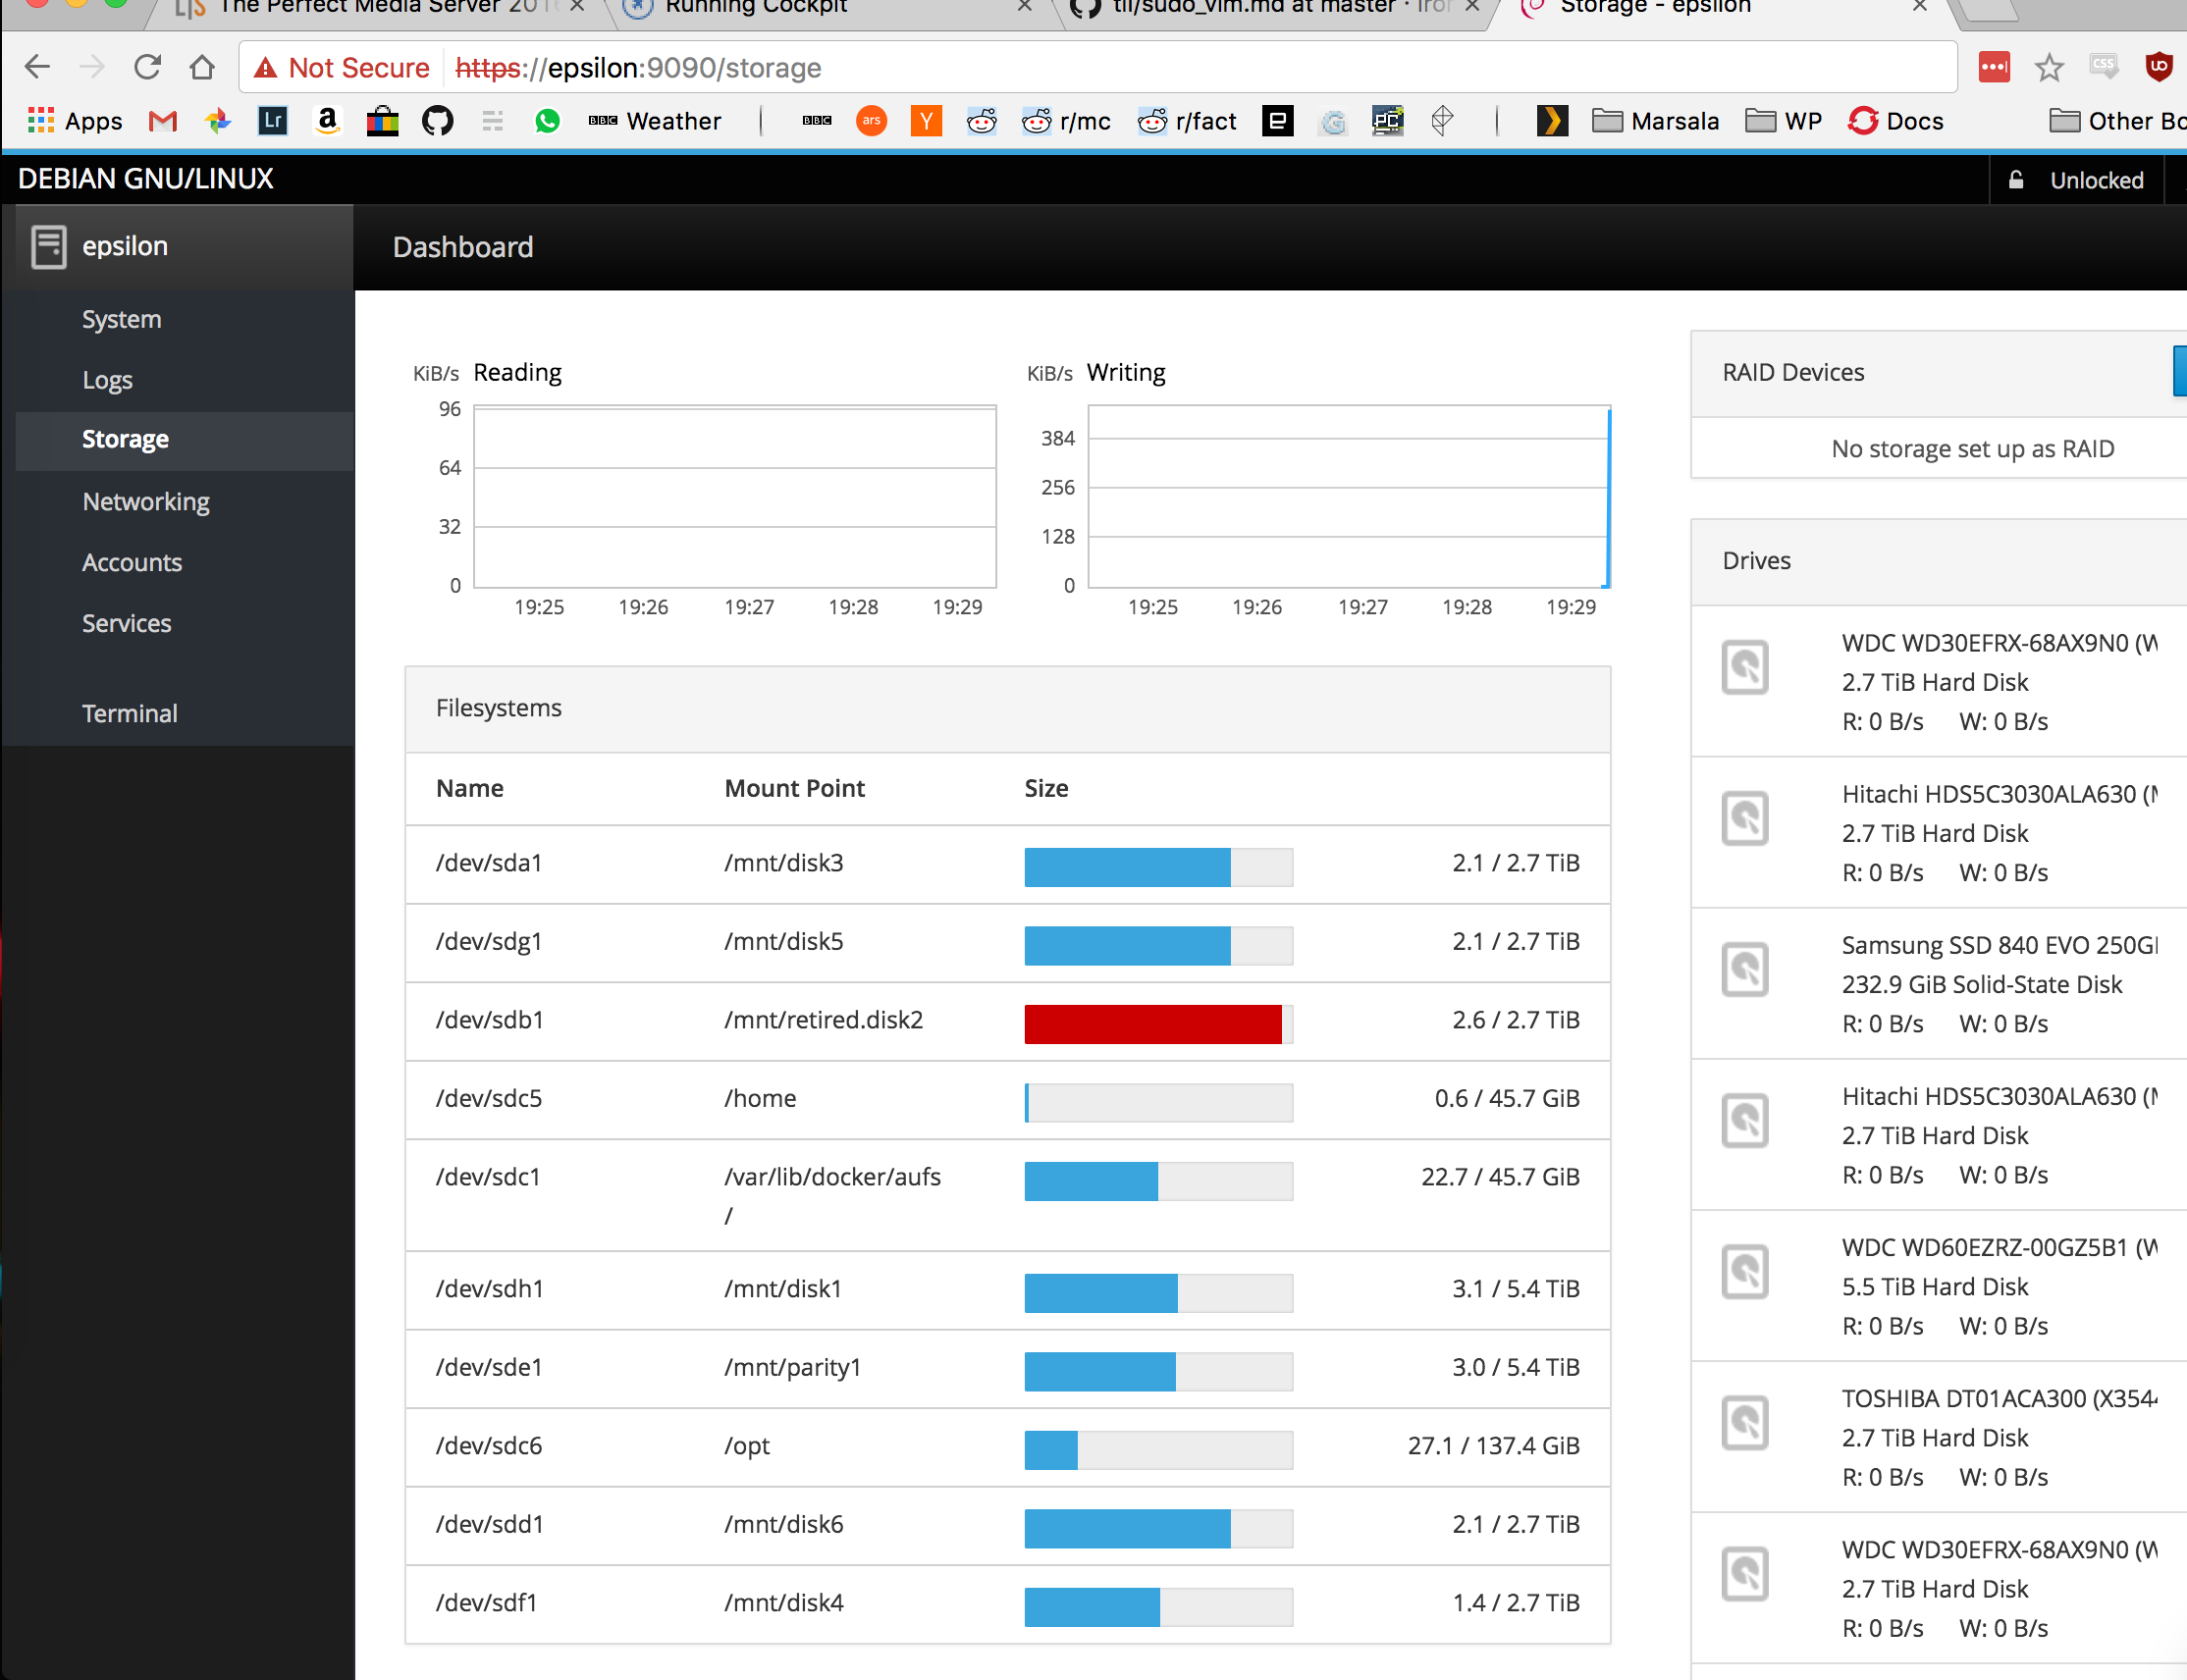
You should now be able to run mount -a followed by df -h to see the following output.
/dev/sde1       5.5T  3.1T  2.1T  60% /mnt/parity1
/dev/sdh1       5.5T  3.1T  2.1T  60% /mnt/disk1
/dev/sdf1       2.8T  1.4T  1.4T  51% /mnt/disk2
/dev/sdg1       2.8T  2.1T  643G  77% /mnt/disk3
/dev/sda1       2.8T  2.1T  648G  77% /mnt/disk4
/dev/sdd1       2.8T  2.2T  641G  78% /mnt/disk5
mergerfs         17T   11T  5.4T  67% /mnt/storage
Common problems here include typos, the wrong fstype in the 3rd column or the system doesn't have the correct software installed to mount the drives (XFS for example requires
apt install xfsprogs).
Drive setup summary
This is a bit of a tricky set of steps when you're new, so here's a quick summary before we move on...
-
Create the mount points for:
-
Data drives
-
Parity drives
-
MergerFS pool
-
Create and/or find the drive partitions to mount
-
Create some entries in
/etc/fstab -
Mount your drives!
Installing Docker
![]()
This a the relatively easy bit as docker provide a script you can run to install docker for you. They have documentation you should read if you're curious to know more. Or you can trust me and run:
apt install curl
curl -sSL https://get.docker.com | sh
Beware! Piping something with root privileges to sh is a horrible security risk. Double check the contents of the script at
get.docker.combefore running the above command. It'll probably be fine, but don't just blindly copy and paste from random websites (like this one) as root!!
To make your life easier administering docker add your user to the docker group (you need to be root or have sudo to do this). It is considered a security risk to add users to this group so only do so if absolutely necessary and/or you're a bit lazy like me. This is a home server we're building not a bank.
usermod -aG docker your-userDocker is now installed. Check with systemctl status docker that the service is started. You can run your first container with docker run --rm hello-world to check everything is working as expected.
alex@epsilon:~$ docker run --rm hello-world
Unable to find image 'hello-world:latest' locally
latest: Pulling from library/hello-world
b04784fba78d: Pull complete
Digest: sha256:f3b3b28a45160805bb16542c9531888519430e9e6d6ffc09d72261b0d26ff74f
Status: Downloaded newer image for hello-world:latest

Hello from Docker!
This message shows that your installation appears to be working correctly.
I'm about to show you the power of Docker in the next section, read on...
Installing and configuring SnapRAID
Hopefully you're getting the idea now that the detailed information and rationale for using SnapRAID can be found the 2016 article. A quick TL;DR is that we use SnapRAID to calculate a snapshot of parity data we can use to recover data if a drive fails. I don't pretend to understand the mathematics behind parity but essentially using the arrangement of 1s and 0s from parity, SnapRAID can reconstruct data from a failed drive entirely. If you exceed the fault tolerance of your SnapRAID array you will only loose data on the failed drives, the rest is fine as we are not striping data like a normal RAID would.
SnapRAID (and to some extent MergerFS too) is best suited to largely static datasets, like media. Write once read many is the general rule for suitable datasets. Databases (even such as Plex data) are best excluded from calculations or hosted on a separate storage solution altogether.
Compiling and installing SnapRAID
SnapRAID isn't in the debian repos so we have to compile it from source. Let's use docker for this as it means we don't need to install a bunch of stuff on our system we'll only use once. Luckily for you, I have written some scripts that take care of everything and they are available on Github.
Some good discussion about SnapRAID can be found on r/homeserver.
The steps required to install SnapRAID are
- clone the git repo
- compile snapraid using the
build.shscript - install the compiled
.debfile.
Run the following commands and you'll end up with SnapRAID installed.
apt install git
git clone https://github.com/IronicBadger/docker-snapraid.git
cd docker-snapraid/
chmod +x build.sh
./build.sh
cd build/
dpkg -i snapraid*.deb

snapraid -V
# snapraid v11.1 by Andrea Mazzoleni, http://www.snapraid.it
For me, this highlights just how cool docker can be. We've just installed a bunch of build dependencies and compiled some software from source and not left a trace on the host system. Containers rock!
If the version is behind what's available at snapraid.it please notify me @IronicBadger or submit a pull request on Github! At the time of writing v11.1 was the latest. SnapRAID should now be installed.
Configuring SnapRAID
Snapraid has excellent documentation to help you get started...
SnapRAID is configured using /etc/snapraid.conf. You can find a full working example that runs my system here. It's a straightforward file to understand. Fill in the blanks, add and/or delete lines as required. Pay attention to the exclude sections as I have my downloads, appdata and other directories there which might not be what you want.
Once you're happy with the contents of the config file run:
snapraid syncThis may take a while so consider running it in screen or tmux so that if your ssh connection dies, the sync continues.
Automating SnapRAID
To ensure that we have a recent snapshot of the arrays data it's a good idea to automate the running of SnapRAID parity syncs. We'll use cron to automate this task and also the excellent snapraid-runner script available on Github. It's a little dated and un-maintained these days but 'just works'.
Remember: Until you complete a parity sync with
snapraid syncyour parity is out of date and any data changes since the last sync are unprotected!
You can find an example configuration file for snapraid-runner in my Github. Edit the variables as required and save it to /opt/snapraid-runner/snapraid-runner.conf. Also, download the snapraid-runner.py file in /opt/snapraid-runner/ too.
mkdir /opt/snapraid-runner
cd /opt/snapraid-runner

wget https://raw.githubusercontent.com/Chronial/snapraid-runner/master/snapraid-runner.py
wget -O snapraid-runner.conf https://raw.githubusercontent.com/IronicBadger/ansible/master/roles/epsilon/templates/opt/snapraid-runner.j2
Finally, let's add an entry to cron with crontab -e and paste in the following (this sets the script to run at 8am daily - change it as you see fit.
00 08 * * * python2 /opt/snapraid-runner/snapraid-runner.py -c /opt/snapraid-runner/snapraid-runner.confSnapRAID is now automated. You modify the threshold that the sync will auto exit if it detects too many files have been deleted since the previous sync - it's set to 250 which I find a good value.
Configuring network file sharing
To turn the system into a NAS we need to enable samba and nfs for network file sharing.
apt install samba nfs-kernel-serverConfigure Samba
Now you have samba installed, backup the default samba config mv /etc/samba/smb.conf /etc/samba/smb.orig, and modify my smb.conf to suit your needs. Usually there are a ton of comments in the file and it gets a bit messy, I've removed everything I could to make it simpler to understand.
## epsilon Samba Configuration

[global]
  workgroup = KTZ
  server string = epsilon
  security = user
  guest ok = yes
  map to guest = Bad Password

  log file = /var/log/samba/%m.log
  max log size = 50
  printcap name = /dev/null
  load printers = no

# Samba Shares
[home]
  comment = alex home folder
  path = /home/alex
  browseable = yes
  read only = no
  guest ok = no

[opt]
  comment = opt directory
  path = /opt
  browseable = yes
  read only = no
  guest ok = yes

[storage]
  comment = Storage on epsilon
  path = /mnt/storage
  browseable = yes
  read only = no
  guest ok = yes
Once the new configuration file is complete, restart the samba service.
systemctl restart smbdConfigure NFS
Most useful for things like Kodi and Linux hosts, NFS is a lightweight way to share files. I never use NFS in write mode, so all of my shares are read only here but modify ro in the configuration file at /etc/exports to change that if you wish.
# /etc/exports

# Usually I only use NFS in a read-only situation and this file is configured
# based on that assumption (primarily KODI).
# http://kodi.wiki/view/NFS

/mnt/storage/movies       *(ro,sync,no_root_squash)
/mnt/storage/tv           *(ro,sync,no_root_squash)
To finish up nfs installation run a couple of commands:
exportfs -ra
systemctl restart nfs-kernel-server
Running apps with docker-compose
The largest change since my original article last year is my now heavy reliance on docker-compose. I bemoaned it in my last article but since then it has been heavily developed and I've grown to really like it.
First of all, let's install docker-compose from the Debian repos...
apt install docker-composeSometimes when using data volumes (-v flags) permissions issues can arise between the host OS and the container. We avoid this issue by allowing you to specify the user PUID and group PGID. Ensure the data volume directory on the host is owned by the same user you specify and it will "just work" TM. I usually end up creating a special user, just for this purpose with useradd dockeruser.
In this instance PUID=1001 and PGID=1001. To find yours use id user as below:
$ id <dockeruser>
uid=1001(dockeruser) gid=1001(dockergroup) groups=1001(dockergroup)
Create /etc/environment and add the following two lines using the ID of the user from the above command.
PUID=1001
PGID=1001
Next, let's define the docker-compose.yml file which will tell Docker all of the parameters we want to feed to each docker container. You can find my full yml file on Github here. Hopefully it'll give you some inspiration!
# /opt/docker-compose.yml
---
version: '2'
services:
  plex:
    image: plexinc/pms-docker
    container_name: plex
    volumes:
      - /opt/appdata/plex:/config
      - /mnt/storage:/data
    network_mode: host
    restart: always
    environment:
      - PUID=${PUID}
      - PGID=${PGID}
  plexpy:
    image: linuxserver/plexpy
    container_name: plexpy
    depends_on:
      - plex
    volumes:
      - /opt/appdata/plexpy:/config
      - /opt/appdata/plex/Library/Application\ Support/Plex\ Media\ Server/Logs:/logs:ro
    ports:
      - 27029:8181
    links:
      - plex
    restart: always
    environment:
      - PUID=${PUID}
      - PGID=${PGID}
Once you're happy that you have defined the applications you want, let's run them!
docker-compose -f /path/to/docker-compose.yml up -d
docker-compose -f /path/to/docker-compose.yml logs
A couple of top tips here are to save passing the -f file.yml everytime is to use a bash alias. Edit ~/.bash_profile and add the two followings lines. Then run source ~/.bash_profile.
alias dcp='docker-compose -f /opt/docker-compose.yml '
alias dclogs='docker-compose -f /opt/docker-compose.yml logs -tf --tail="50" '
You then type dcp <command> instead of docker-compose -f /path/to/file.yml <command>. Just a nice quality of life tweak.
Updating your containers
Updating to the latest versions of your containers is often a big pain but with docker-compose it's dead easy. Type dcrun pull, wait for the updated versions to pull if available then type dcrun up -d and watch the magic. Most things you could do with docker alone are possible with docker-compose. If you find any neat tricks, let me know!
Cockpit UI
This tool probably deserves it's own article but for now, it's stuck at the end of this massive long one. We are always looking for writers so if you're at all interested get in touch!
Add the following to /etc/apt/sources.list
deb http://repo-cockpitproject.rhcloud.com/debian/ stretch mainThen run:
apt update
apt install cockpit cockpit-docker cockpit-machines
systemctl status cockpit
Go to https://<server-ip>:9090 and authenticate using your system username and password.
From here you can do most daily tasks including managing your containers too. I've only recently discovered Cockpit so have only scratched the surface. If you find interesting stuff to do with Cockpit, let us know in the comments.
Portainer.io container UI

Portainer is a great way to manage your containers with a webUI, LinuxServer.io is even their only featured template partner! It's very easy to get setup, just add the follow to your docker-compose.yml file and you should be good to go. Portainer
portainer:
  image: portainer/portainer
  container_name: portainer
  ports:
    - 9000:9000
  volumes:
    - /opt/appdata/portainer:/data
    - /var/run/docker.sock:/var/run/docker.sock
  restart:
    always
Summary
Congratulations! You've now finished setting up your completely free and open source software based home media server. You know every nut and bolt down to the last and hopefully learned some stuff along the way.
In terms of feature parity of this solution versus paid solutions I'd be keen to know your thoughts. I haven't covered KVM GPU passthrough stuff here though it is easily possible with a few packages - if this is something you're interested in again, get it touch and we'll cover it.